Editing a Document
Insert Document Elements
Insert Link
You can also add external links to your document and re-direct the readers to another page.
To insert link:
- Select the word or phrase to which you want to add the link.
- In the Insert tab, click the Link icon.
- Enter the link in the text box, and click apply. The link will be added to the selected text. You can also delete or modify the link by clicking on the text.
Insert Shape
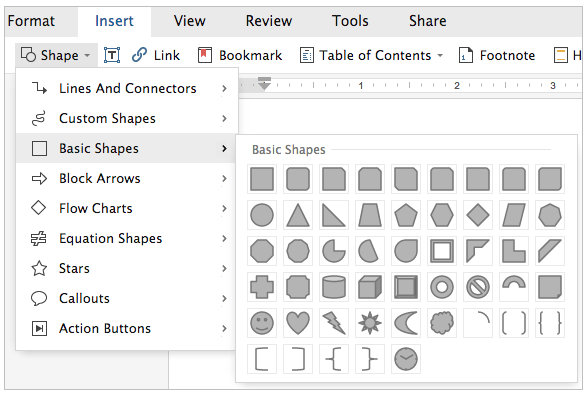
With Writer you can insert shapes in documents or combine multiple shapes to make a drawing or a more complex shape.
To insert a shape:
- In the Insert tab, click the Shape drop-down list.
- Chose the type of shape you want, and start drawing on your document.
- To edit the shape, click the shape on your document to display the Shape tab. You can fill color, edit shape or add effects to your shape.
Insert Image
You can add images to your documents directly from the web or from your local drive.
To add image:
- In the Insert tab, click the Image
 drop-down list.
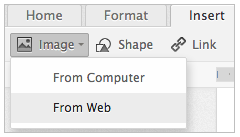
- To add an image from the computer, click From Computer, browse the file and click Insert.
- To add image from Web, click From Web, add the URL, and click Insert.
- In the Insert tab, click the Image
Insert Video
Adding videos to your document is as easy as it can get. You can directly embed YouTube videos to your documents and make it more interactive.
To insert video:
- In the Insert tab, under Quick Parts section, click the drop-down arrow on the Video
 icon.
icon. - Paste the YouTube link in the text box and the video is displayed.
- Click Insert. The video is embedded in your document.
- In the Insert tab, under Quick Parts section, click the drop-down arrow on the Video
Use Bookmark
Bookmarks are shortcuts to specific places within a document. You can use bookmarks when you need to make a table of contents, or when you want to jump from one part of a long document to another without scrolling.
Create a Bookmark
To create a bookmark in a document:
- Select the text where you want to place the bookmark in your document.
- In the main menu, click Insert, and click the Bookmark
 icon. A pop-up window is displayed.
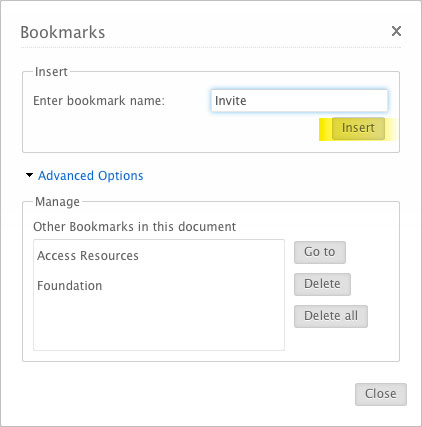
- In the Enter bookmark name field, type the name of the bookmark.
The text is bookmarked and the bookmark icon is added beside the text for reference.
 - To remove a bookmark, click the bookmark
 icon and then click Remove.
Creating a Link to the Bookmark
You can link your bookmarks as reference anywhere in your document, and avoid scrolling to reach different sections.
To create link to a bookmark:
- Select the text that you want to link.
You can also click anywhere in your document to create a link there. - In the main menu, click Insert, and then click the Link
 icon.
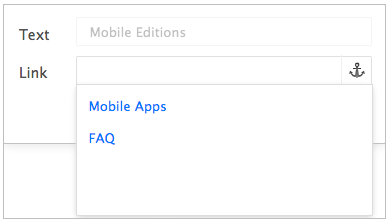
icon. - In the Link box, click the Bookmark
 icon
icon - Click the appropriate bookmark name
- Click Apply.
- Select the text that you want to link.
Note:
- If you need to edit or remove the link, click the text and from the small pop-up select Modify Link or Remove Link.
Add Table of Content
A table of contents makes it easy for you, your collaborators, and viewers to quickly navigate to a section in your document.
To add table of content:
- Select the Heading text.
- In the Home tab, select the heading style. By default, the heading style if selected as Normal.
- After applying heading styles for all the headings in your document, place the cursor where you want to insert the table of content.
- Click Insert > Table of Contents. Choose a style from the gallery to add the TOC in the document.
- To customize the TOC, click More Options. Make the necessary changes in the Table of Contents window to generate the TOC as per the selection made.
- You can continue to add headings to your document or change current headings. To reflect the changes in the table of contents, in the table of contents table click the Refresh
 icon.
icon. - To remove the table of contents click the Delete
 icon.
icon.
Add Mathematical Equations
You can easily insert mathematical equations into your documents, and collaborate on a single equation with multiple people.
To add an equation to the document:
- In the main menu bar, click Insert and click the Equations
 icon. The LaTex editor window is displayed.
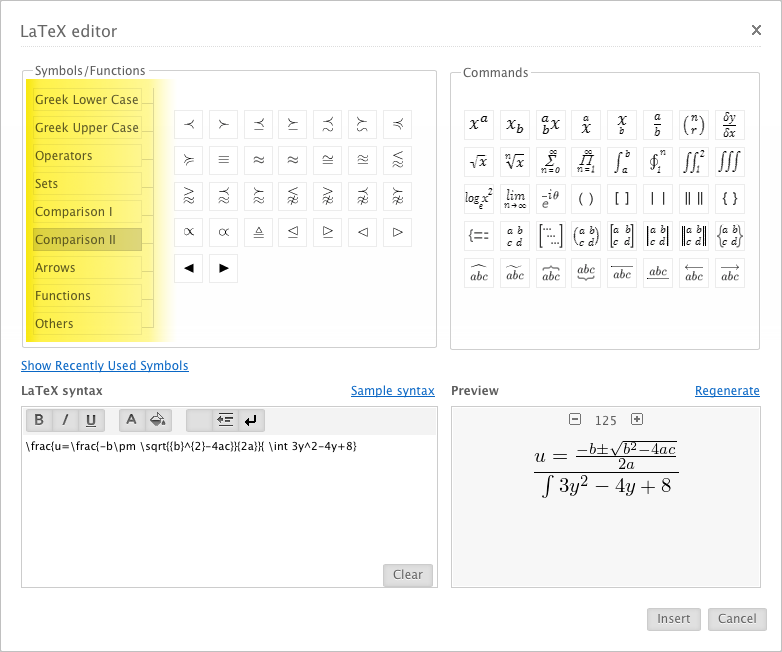
- From the Symbols/Functions section, select the appropriate category. The corresponding symbols for that category is displayed.
- Click the symbol you need to add to the document, and click Insert.
Note:
- You can view the syntax and preview of the symbol selected by you, in the LaTex syntax and Preview section of the window.
Add and Delete Tables
You can easily add tables to your document and delete each row, column, or cell individually.
To add a table:
- In the main menu, click Insert >Table.
- Select the number of rows and column and click to add the table to your document.
- To add more rows or columns, click the right and left arrow key that appears when you click on a cell.

Add Footnote
To insert footnotes:
- Place your cursor where you want to add the note, click the Insert tab and select Footnote. The Endnote/Footnote window is displayed.
- Select the Footnote radio button and type in your footnote in the pop-up window.
- Click Insert.
Notes:
-
- Footnotes appear in the document margin on your screen, and at the bottom of the page when printed. If you'd like to see how the footnotes will look when printed, go to the File > Print. You can see the preview in the print window.
- To delete a footnote, delete the footnote from the body of the document, and this will delete all content for that footnote.
- When you make a copy of a document, footnotes will be copied as well. If you copy and paste text that contains a footnote, however, the footnote may not be copied and pasted by default.
Format Document
Add Text Color
You can change the text color of your document from the variety of colors available in Writer. You can also create your own color by using the advanced color palette.
To add text color:
- Select the text to which you want to add the color.
- In the Home menu, click the drop-down arrow on the Font Color
 icon.
icon. - Choose the color required for your text. The selected text color will change automatically.
Add Background Color
You can add background colors to selected text to highlight or emphasize the text. You can choose from the colors available or create your own color from the advance color palette.
To add background color:
- Select the text to which you want to add the color.
- In the Home menu, click the drop-down arrow on the Background Color
 icon.
icon. - Choose the color required color. The background color is now applied on the selected text.

Note:
- For more colors, click the More colors link, and choose color from the advance color palette.
Highlight Text
Using this option you can highlight a selected sentence or paragraph. It helps to emphasize the section, and highlight main features in the documents.
To highlighting text:
- Select the text that you want to highlight.
- In the Home tab, click the Shading
 icon, and choose your appropriate shade. The selected text will be highlighted with the selected color.
Line Spacing Options
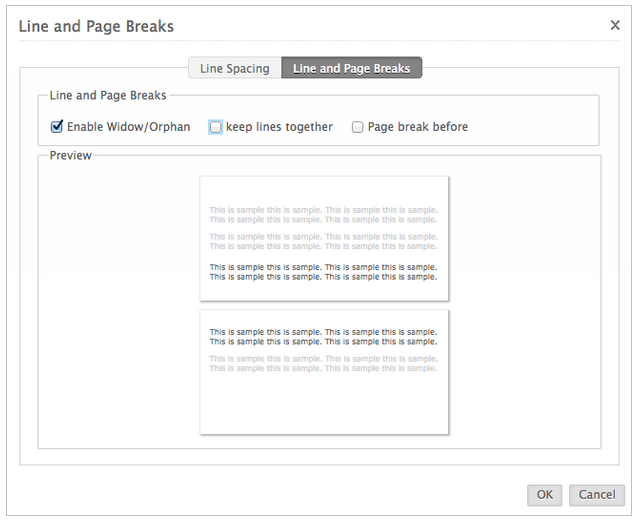
This section explains the various options available to set the line spacing details for your document. Line and Page break options available in Writer allows you to control the way paragraphs split across pages. You can avoid having widow or orphan lines and choose to avoid keeping a single line of the paragraph at the top or bottom of the page. Instead, you can either move two lines of the paragraph up or down or shift the entire paragraph to the next page.
To customize line spacing options:
- Select one or more paragraphs to enable the line break option.
- In the Home tab, click the Line Spacing icon and then click Line and Page Breaks.
- In the window, click the Line and Page Breaks tab and check the appropriate option.
- Click Ok. The option will be applied to the selected paragraph(s).
Use Tabs and Rulers
Using the tab settings option you can set the tab points in the ruler as per your specification and not manually move the cursor to place your content.
To set the tab points:
- In the Format tab, click Tabs. The Tab Stop Position window is displayed.
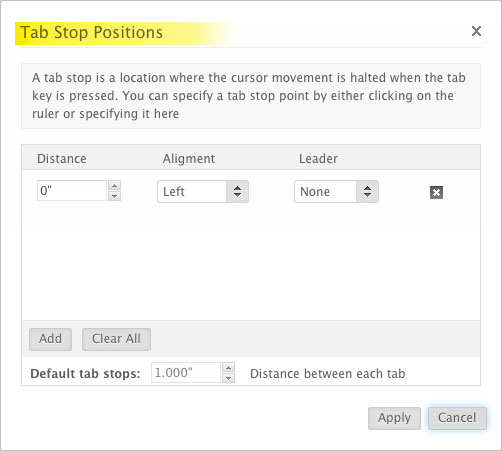
- Click the Add button to add multiple stop points.
- Set the required Distance, Alignment, and Leader for each tab point.
- To delete a tab point, click the icon next to each tap point.
- You can also set the measurements for Default tab stops.
- Click Apply.
- In the Format tab, click Tabs. The Tab Stop Position window is displayed.
Borders and Shading
This section will guide to customize border and apply shading.
To apply border and shading:
- In the Format tab, click the Borders and Shading.
- In the Borders and Shading window, under Border section, click the Top, Right, Bottom, and Left check boxes to add borders.
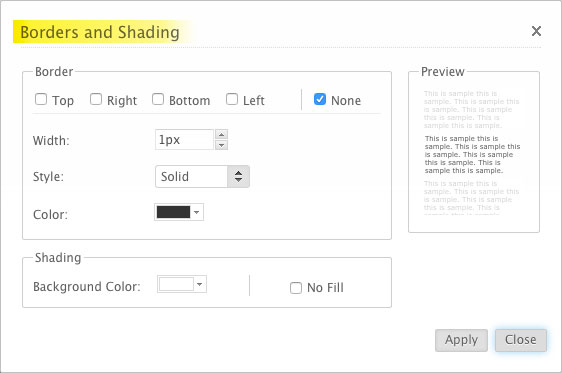
- Select the Width, Style, and Color from the respective fields.
- In the Shading section, select the required background color, and click Apply.
Tip: You can see the Preview in the right side of the window before applying the style.
Line Break Options
You can format your document better using the advanced line break options available. The widow or orphan lines can be taken care of using these options.
To insert line breaks:
- Select one or more paragraphs to enable the line break option.
- In the Home tab, click the Line Spacing
 icon and then click Line and Page Breaks.
 - In the window, click the Line and Page Breaks tab and check the appropriate option.
- Click Ok. The option will be applied to the selected paragraph(s).

Document Layout
Add Header and Footer
You can customize and set header and footer for your documents.
To add header and footer:
- Double click in the header and footer area of the document to open the Header and Footer section.
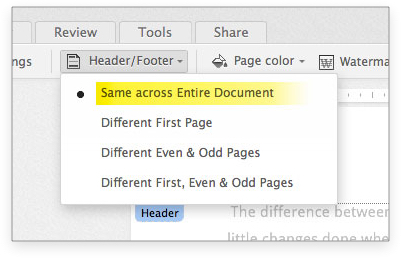
- Enter the text for header and footer.
- In the Insert tab, click Header/Footer drop-down list and choose the appropriate positions for the header/footer.
- Double click in the header and footer area of the document to open the Header and Footer section.
Add Watermark
To add watermark to your document:
- In the Insert tab, click the Watermark
 icon. The Insert Watermark window is displayed.
 - To add a text watermark, click the Text Watermark option.
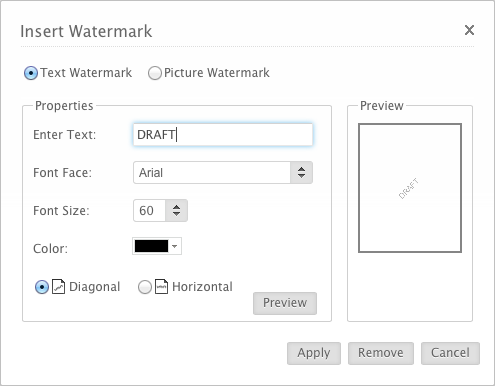
- Enter the desired text, set the proper format, and click Apply.
- Or
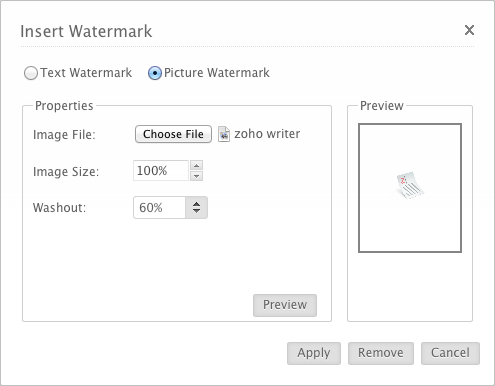
- To add a picture watermark, click Picture Watermark option.
- Click Browse to add image for the local drive. Set the image properties as per your requirement, and click Apply.
- In the Insert tab, click the Watermark
Advanced Editing Tools
Format Painter
This is an useful tool that is used to copy format from a text and apply it the selected text.
To use format painter:
- Select the text from which you want to copy the formatting and style.
- In the Home tab, click the Format Painter
 icon.
icon.
- Click the text to which you want to copy the style. The style will be applied to the selected text.
Auto Correct
You can opt for the Auto Correct option, if you want a misspell word to be automatically replaced with another at all instances.
To use the auto correct option:
- Right click on the word showing an error, and in the drop-down list, click Auto correct.
- A pop-up window is displayed, and the flagged word is listed under the Replace field.
- In the With field, enter the word that you want it to be replaced with.
- Click Add. The word that was flagged will be automatically replaced with the word you entered in auto correct.
Insert Quick Text
Quick Text helps in storing the most used content as a mini templates in Writer. You can create save number of content as Quick Text, including custom header and footer, paragraph for a standard letter, graphical image of sales growth, product comparison table, or others. The data can be stored and used across all the writer documents.
To create Quick Text in Writer:
- Select a range of text in your document.
- In the main menu, click Tools, and click the Quick Text icon. The drop-down list is displayed.
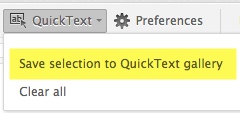
- In the drop-down list, click Save selection to Quick Text gallery. The text is now added to the gallery.
Related Articles
Editing a Spreadsheet
Cell Formatting Text Color To change text color 1. On the Home Menu, click Text Color icon. 2. Choose the required font color. The selected font color is applied to the text. Cell Color To change cell color 1. Choose Fill Color icon from Home ...Editing an existing canned message
Select the "Canned Messages". In the Messages section, hover over the name of the Canned Message you would like to edit, and then click the icon to the left of the message name, and click on the "Edit" button from the drop-down menu that appears. You ...Document Management
1. Check-In / Check-Out Control Docs provides a check-in/check-out feature that allows only one person to work on the document at one time. The Check-in/Check-out function, is very helpful in a collaborative environment as it prevents team members ...Customizing Document Styles
Change Document Style Writer allows you to customize your own themes and setup documents as per your requirement. Using Custom Styles, you can customize the the styles for the headings and the body text and even save them with as templates to use it ...What is Document management?
It is an Online Document Management system where you can store all your files securely in a centralized location and can access them from any where and from any device. You can upload, store, create, edit, share, and view any type of files like ...