Editing a Spreadsheet
Cell Formatting
Text Color
To change text color
1. On the Home Menu, click Text Color  icon.
icon.
2. Choose the required font color. The selected font color is applied to the text.
Cell Color
To change cell color
1. Choose Fill Color  icon from Home Tab.
2. Click the required color. The color is applied to the chosen cell.
Align Cells
You can change both the horizontal and the vertical alignment of data entered into the cell.
To change the alignment of cells
1. On the Main menu, click Align Horizontally or Align Vertically to align cells.
2. Choose to align left, right or center horizontally.
3. Top and bottom alignments can be performed using vertical alignment. Use the following
icons to align cells. 
Shade Borders
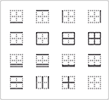
The borders of a cell can be shaded using the given icon  . You can choose various types of border shadings that are available to apply to the cell. These are the types that you can choose from :
Merge Cells
To merge cells together
-
Select all the cells that you would like to merge together in order to form a single cell.
-
On Home menu, click Merge Cells
 icon .
 -
You can also choose to merge cells across and down.
Split Cells
To split a cell that has been formed by merging two or more cells together,
-
Select the cell that you want split back into its original components.
-
Choose Merge Cells > Split Cells.
The cell will be split into its original components.
Format Cells
To apply formatting that suits you, use the following steps.
-
Choose Format > Format Cells. The Format Cells dialog box appears.
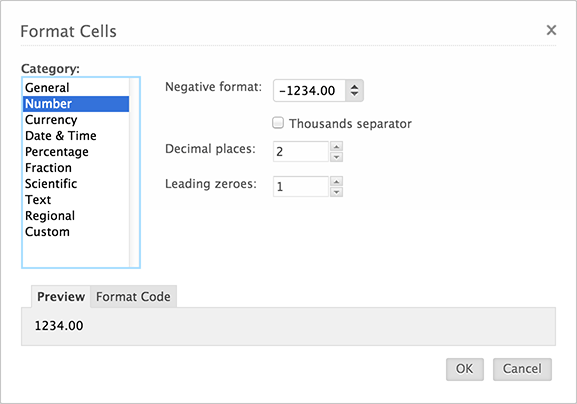
2. Select the required category in which you want to enter data.
3. Choose the settings depending upon you need. For instance, if you choose Date & Time
as your format, then you have various options and formats by which you can display
them.
4. Click OK.
Format Painter
Format Painter can be used to copy the formatting present in a particular cell to other cells of the sheet.
To use Format Painter
-
Click the Format Painter icon available in Home menu.
-
Click on the cell whose formatting you wish to apply to other cells.
-
Now, click the cell for which the formatting of the first cell is to be applied.
-
If more than one cell is to applied with the same formatting, then drag and select all the cells that are to be applied with that formatting style.
Clear Formatting
To clear the formatting of a cell
-
Click the cell that you want to be cleared of its formatting or select a range of cells.
-
Choose Clear
 icon from Home Tab. You can choose to clear a cell of its contents or formatting or the hyperlink provided from the cell.
Conditional Formatting
Conditional Formatting can be used in cases where data needs to be viewed easily for the sake of better references and data interpretation. It is helpful when data that fall under certain conditions are to be highlighted such that they can be looked at easily in the spreadsheet. Conditional Formatting is mainly used to highlight data that pertain to a particular condition.
Apply Conditional Formatting
To apply conditional formatting
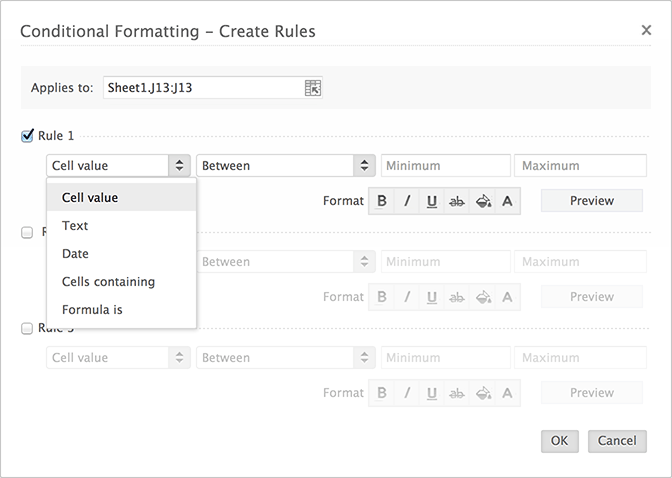
1. On the menu bar, click Format > Conditional Formatting.
2. A pop up menu called Create Rules is displayed.
3. Choose the required range for which formatting is to be applied by using the range selector tool.
4. Select the conditions that are required in order to display the data in required format.
5. The conditions can be set based upon the following data types.
-
Cell value
-
Text
-
Date
-
Cells containing
-
Formula
6. Choose the required data type for which formatting is to be performed and choose the
conditions.
7. The formatting options that are available include Bold, Italic, Underline, Strike through, Cell
Color and Text Color. 
8. You can also view the preview of the required formatting done in the dialog.
Manage Conditional Formatting
To manage conditional formatting
-
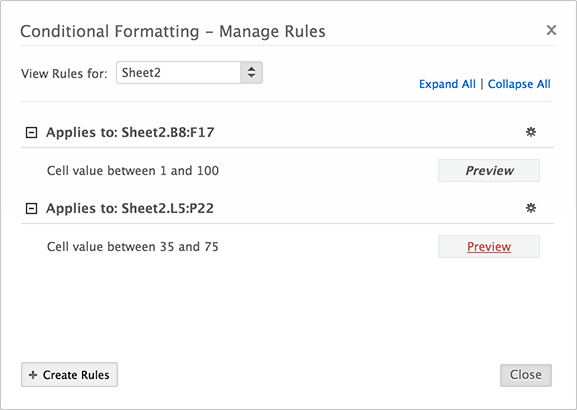
On the menu bar, click Format > Conditional Formatting > Manage Formatting.
-
Choose to edit, copy or clear the rules that have been set and listed under the toolbox using the Settings icon.
-
View a rule that has been created in an expanded or a collapsed mode.
Insert & Delete
Inserting a new row or a column is helpful when a new entry or a field is to be added along with the existing data.
Insert Row
To insert a new row into the sheet
Method 1
-
Click Insert > Row.
-
If you want a row to be inserted above the selected cell, click Row Above.
-
Click Row Below if you want a new row to be inserted below the selected cell.
Insert Column
Inserting a new column is similar to inserting a new row.
Method 1
-
Click Insert > Column.
-
You can choose to insert a column before or after the cell that has been selected.
Method 2
1. Click Add New Column  icon present in Home tab.
Delete Rows And Columns
Deleting a row or a column comes in handy when you want to remove a particular field or entry that consists unnecessary data.
To delete a row or a column
-
Select the row or column that you wish to delete.
-
Right click the selected row or column.
-
Click Delete Row or Delete Column from the context menu.
The selected row or column will be deleted. You can also right click on a cell that has been selected and choose to delete the row or the column in which the cell is present.
Inserting/ Deleting a Cell
When a cell needs to be shifted from its position in order to be replaced by new data, these are the steps that are to be followed.
To insert a new cell:
Method 1
1. Right click the cell near which you need to insert a new cell.
2. Choose "Shift Cells Right" or "Shift Cells Down" according to your need.

Method 2
1. Select the Home menu. In the Home menu toolbar, there is an option next to the Insert Rows and Columns in the tool bar which can be used to insert cells.

Method 3
1. Choose Insert > Insert Cell. There is an option next to Insert Rows or Columns which can be used to insert cells.
To delete a cell:
Method 1
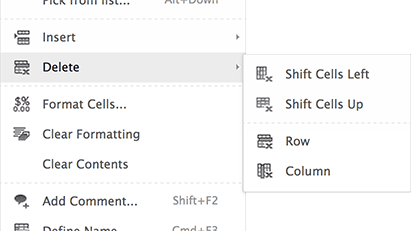
1. Right click the particular cell with the value you want to delete.
2. Click Delete where you can choose to "Shift Cells Left" or "Shift Cells Up". Shifting cells left causes the value of the cell to be deleted and replaced with the data found in the cell to the right of it.
Method 2
1. Select the icon  present in the Home menu to delete cells.
Insert Image
To insert an image
-
Click Insert > Image.

-
Choose from Collected Images or upload a new image from your computer or from the web.
-
Click Insert.
Add Comment
You can use comments to notify your collaborators or to start a conversation with them regarding a cell.
To add a comment:
-
Right click the cell on which you wish to comment and choose Add Comment.
-
Enter your comment in the dialog box.
-
Click OK.
Related Articles
Editing a Document
Insert Document Elements Insert Link You can also add external links to your document and re-direct the readers to another page. To insert link: Select the word or phrase to which you want to add the link. In the Insert tab, click the Link icon. ...Editing an existing canned message
Select the "Canned Messages". In the Messages section, hover over the name of the Canned Message you would like to edit, and then click the icon to the left of the message name, and click on the "Edit" button from the drop-down menu that appears. You ...Sharing a spreadsheet
Share a spreadsheet To share a spreadsheet: 1. Click Share in the menu bar. 2. Enter the email addresses of the collaborators with whom you want to share the document. 3. You can allow the collaborator to only read the sheet (Read only), read and ...Reviewing a Spreadsheet
Versions and Version History "Versions" is a feature available in Sheet that makes editing the sheet easy. When you edit a spreadsheet as you work, there are multiple changes made to the sheet. Sometimes, you wish to restore an earlier version of the ...Creating and Saving a Spreadsheet
Create a New Spreadsheet Spreadsheets can be accessed from Docs. To create a new spreadsheet: Method 1: 1. To create a new spreadsheet directly from Docs main menu, click Create > Spreadsheet. ...