Integrating Gmail wih Client Management
Client Management allows you to retrieve your emails from Gmail within your CRM account. All you need to do is configure the POP settings and select you Gmail account as the mailbox.
Follow the steps given below to integrate Gmail with Zoho CRM:
- Enable POP forwarding in Gmail
- Set up POP Account
- Configure Mailbox
Enable POP Forwarding in Gmail
To create time based actions
- Sign in to Gmail.
- Click
 (Settings icon) and select Settings.
 - In the Settings page, click Forwarding and POP/IMAP.
- Select Enable POP for all mail or Enable POP for mail that arrives from now on.
- Choose what to do with your messages after your POP client or device receives them.
- Click Save Changes.
Gmail - POP account details
These details are required while setting up the mailbox in Zoho CRM.
| File | Value |
| Incoming mail server name | pop.gmail.com |
| Outgoing mail server name | smtp.gmail.com |
| Incoming Port No. | 995 |
| Outgoing Port No. | 465 |
| Secure Connection (SSL) | Yes |
| User name | username@gmail.com |
Set up POP Account
To set up POP account in CRM
- Log in to CRM.
- Click Setup > Personal Settings > Email Settings > POP (Zoho Mail).
- In the Zoho Mail Add-on page, click Configure Now.
- In the Zoho Mail Add-on page, click the Add Mail Account link.
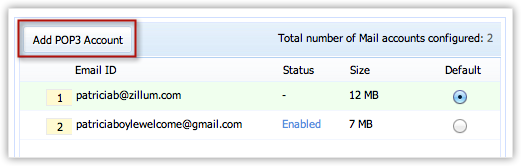
- In the Zoho Mail POP3 Settings page, click Add POP3 Account.
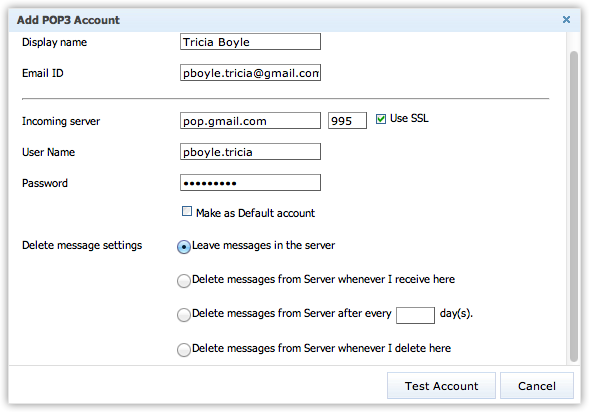
- In
the Add POP3 Account, specify the required details to configure POP
service for your email account. Refer to the table given above.
Note
- If you do not use any POP clients other than Zoho Mail, your Username can just be username@gmail.com.
- If you are using multiple POP clients, you need to tag the Username as 'recent:username@gmail.com'. Also, make sure that Leave messages in the server is selected for the Delete message settings option. Please note that this is applicable only to Gmail users.
- Click Test Account to authenticate the email account details are provided and check the incoming server.
- Click Create Account.
The email account will be configured. You can enable this account as your default mail account.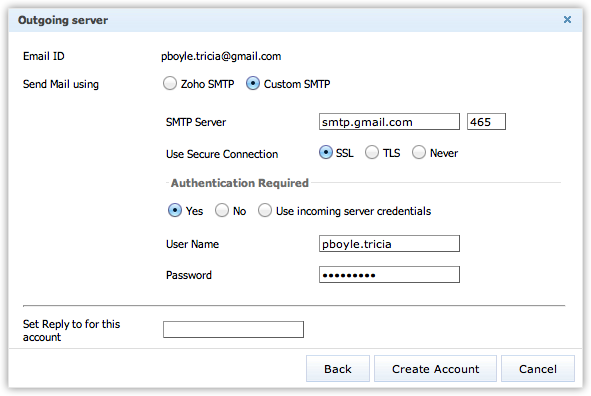
- Click Save.
Related Articles
Understanding Client Management System
System Requirements Client Management System is an on-demand, user-friendly application, compatible with basic system configurations. We suggest you take a look at the system requirements, listed here. Operating System Windows, Linux and Mac OS X Web ...How does Client Management Work?
Essentially, CRM works by collecting leads or consumer information, analyzing the collected information to understand customer or market requirements and adjusting marketing campaigns accordingly to increase sales. CRM also serves customer service ...Export Client management system Data
To export data from the modules (through Data Administration Tools) Click Setup > Data Administration > Export. In the Export Data page, select the module from which you want to export data from the Select Module list. Click Export. The records will ...What are the modules in Client management system I can sync my contacts from?
You can sync contacts from the Contacts and Leads module. You can also sync contacts from respective custom views.How do I terminate Client management system access for an employee who is leaving our company?
You can terminate Client management system access for an employee who is leaving your company by either deactivating the user or deleting the user.