Manage list view
Standard List Views
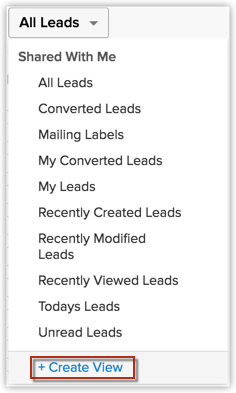
In the <Module> Home page, you can select the required list view from the View drop-down list. You can only rearrange the order of the columns or add more columns to the standard view modes. Some of the standard list views are: All Records, My Records, Recently Create Records, Recently Modified Records, Recently Viewed Records, etc.
Create Custom List Views
You can create custom list views in CRM by defining criteria as per your requirement. The custom views created by the user will be listed under the Created By Me in the drop down list.
To create custom views
- Click the [Module] Tab.( For e.g. Leads, Contacts, Accounts, etc.)
- In the [Module] Home page, move your mouse pointer to the list view's drop-down.
- Click the Create View link.
- In the New View page, do the following:
- Enter the custom View Name.
- Select the Mark as Favorite, if required.
The custom list views marked as favorite will be listed first in the list view drop-down.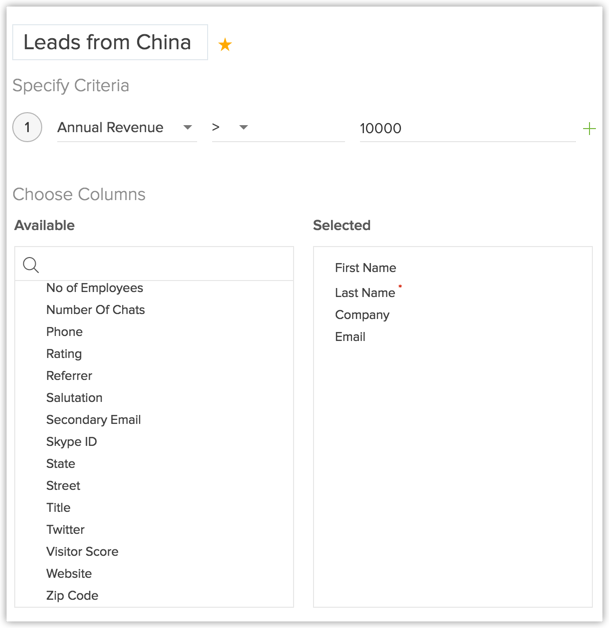
- Select the columns to be displayed in the View mode.
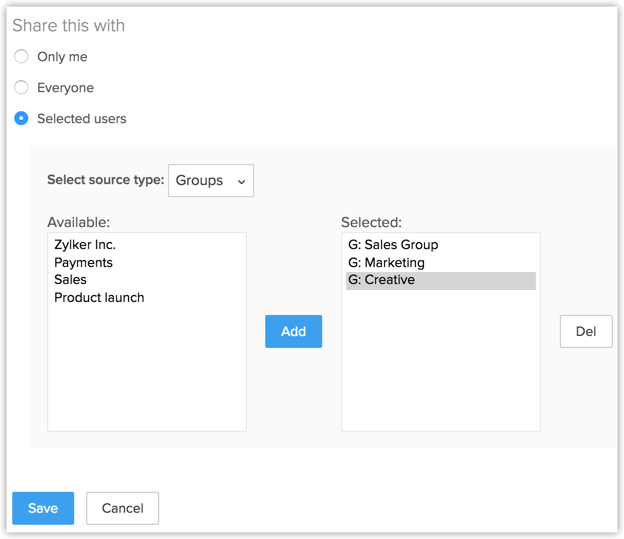
- Choose the option as to who can see this view.
- Specify Criteria to filter the records.
- Click Save.
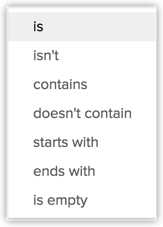
Specifying List View Criteria
In the Specify Criteria section you can specify the criteria based on which records will be filters and under this list view. The following table lists the criteria options for certain types of fields:
| Field Type | Criteria Options | ||
String fields like:
|  | ||
Numeric fields like:
| 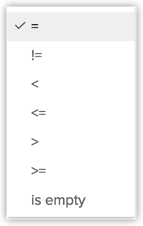 | ||
Date & DateTime fields like:
| 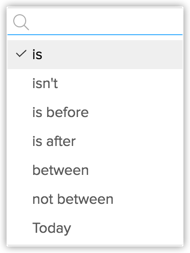 | ||
Boolean fields like:
| 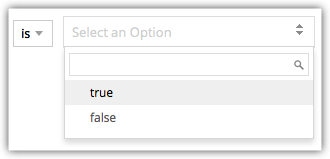 |
Selecting List View Columns
In the Choose Columns section, select the columns to be displayed in the List View from the Available Columnslist box. After selecting the columns you can change the order of the columns or remove unnecessary columns from the Selected Columns list box.
Note
- It is better to select less than 10 columns to avoid horizontal scrolling in List View.
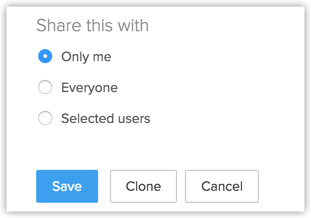
Setting up Permissions to the List View
In the Accessibility Details section, define the user's accessibility to view the custom lists. The following options are available:
- All users are allowed to view this custom view.
- Show this custom view only to me.
- Allow the following users to view this custom view.
To edit criteria patterns
- Click Module tab.
- Select a List View from the drop-down list.
- In Edit View page, review your existing criteria and click the Change Pattern link.
- In Pattern Editor box, modify filters and click the Save link.
- Save the modified custom view.
The criteria pattern will be automatically set as:
Since the criteria pattern does not match the requirement, you can edit it as:
You can use the following characters in the Criteria Pattern Editor:
- Round brackets: ( )
- and / or operators
- Criteria Row Number
- Important notes
- When the Change Pattern box is open, you cannot add or delete a criteria row under the Specify Criteriasection.
- The operator precedence will not be taken into account if you do not specify brackets. For example, if you specify the criteria as 1 or 2 and 3, it will be considered as ((1 or 2) and 3)
- You can change the and or or of the criteria rows and it will be updated in the Editor below.
- You can change the and or or condition in the pattern and it will be updated in the rows above.
- If you specify 1 and 2 and save it, on editing the view the pattern will be shown as (1 and 2). For (1 and 2) or 3 the pattern will be shown as ( (1 and 2) or 3 )
- If you add more rows in the editor and delete one by one there will be additional brackets displayed in the pattern. For example if there are 5 rows added and you delete the 4th row, it will be shown as ( ( ( ( 1 and 2 ) or 3) )or 4 ) and if the 3rd row is deleted again it will be shown as ( ( ( ( 1 and 2 ) ) ) or 3 ). If the first row is deleted then it will be shown as ( ( ( ( 1 ) ) ) or 2 ). However, upon saving the criteria, it will become ( 1 or 2 ). ( ( ( 1 and 2 ) and 3 ) ) will appear if the last criteria is deleted.
- Make sure that you do not use the following as they are invalid: (), (and), (or)
- If the brackets do not match it will be treated as invalid.
- You will get an error message, if the number of rows and the numbers given in the pattern do not match and also, if there are any missed numbers in the pattern specified.
- Save and Cancel buttons on the custom view will be hidden while editing the criteria pattern.
- In case the final brackets are missing, there will be a difference in the Criteria Patterns Editor and its view mode.
Your Criteria Pattern in Editor Your Criteria Pattern in View Mode ( 1 and 2 ) or ( 3 and 4 ) (( 1 and 2 ) or ( 3 and 4 )) 1 and 2 and 3 and 4 (1 and 2 and 3 and 4 ) ( 1 or 2 ) and ( 3 or 4 ) ( ( 1 or 2 ) and ( 3 or 4 ) )
To use the Last Activity Time in criteria
- Click the Leads, Accounts, Contacts or Potentials module.
- Select a List View from the drop-down list and click the Edit link.
You can specify criteria only for the custom list views. - In Edit View page, under Specify Criteria select the Last Activity Time from the drop-down list.
- Specify the criteria conditions.
- Click Save.
Clone Custom List View
The custom views that you create can be duplicated and a similar list view can be created. Please note that the default views cannot be cloned or deleted.
To clone custom list views
- Click the [Module] Tab.( For e.g.. Leads, Contacts, Accounts, etc.)
- In the [Module] Home page, select the list view that you want to duplicate.
- Click the Clone View link.
- In the Clone View page, do the following:
- Enter the custom View Name.
- Select the columns to be displayed in the View mode.
- Choose the option as to who can see this view.
- Select the Specify Criteria check box and specify the criteria.
- Click Save.
Edit Standard List View
You can edit the standard list views that are by default provided in CRM to add or remove the columns in the list view. Please note that you cannot edit the criteria or rename these pre-defined list views.
To edit standard list views
- Click the [Module] Tab. (For e.g. Leads, Contacts, Accounts, etc.)
- In the [Module] Home page, select the list view that you want to edit.

- Click the Edit link.
- In the Edit View page, select and move the fields to the Available Columns list box.
After selecting the columns you can change the order of the columns or remove unnecessary columns from the Selected Columns list box. - Click Save.
Sort Records in List View
Records in the list view can be sorted in ascending or descending order.
To sort records
- Click the [Module] Tab. (For e.g. Leads, Contacts, Accounts, etc.)
- In the [Module] Home page, select the list view that you want to see.
- Click on the column heading and then select Ascending or Descending option to sort the records.

Delete Custom List View
The custom views that you create can be deleted if required. Please note that the pre-defined list views cannot be deleted.
To delete custom list views
- Click the [Module] Tab. (For e.g. Leads, Contacts, Accounts, etc.)
- In the [Module] Home page, select the list view that you want to delete.
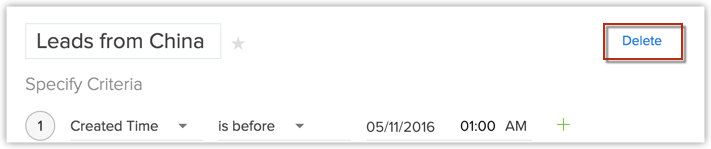
- Click the Delete link.
Related Articles
Visitor Tracking - List View
Each visitor is tracked individually. Once the visitor visits your website, visitor country flag will be displayed in the priority circle with a tool tip over it. Your visitors are pulled into the priority circle based on your priority customization. ...View Month & List View for Events
For the events, you can view the list of records in two types of views: List view and Month View. To view events in month view Go to Events module. In the Record List page, tap the Month icon. The events will be displayed in a month view.Change List View in iPad
You can change the list view that helps you filter the required data based on specified criteria. In each module all the standard and custom list views are available To change list views Go to any module. The records will be listed based on the List ...Change List View using Android
You can change the list view that helps you filter the required data based on specified criteria. For each module the pre-defined views and the ones created by the users will be listed. To change list views Go to any module. The records will be ...Change List View using iPhone
You can change the list view that helps you filter the required data based on specified criteria. For each module All Views and My Views are supported. There are additional pre-defineds and user-defined list views that are also available. To change ...