Manage Users
Add Users
To add users
- Log in to To add users
- Log in to Client management system with Administrator privileges.
- Click Setup > Users & Permissions > Users.
- In the Users page, click Add New User.
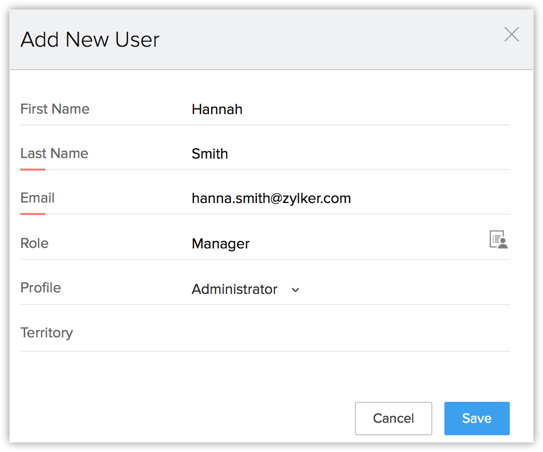
- In the Add New User page, enter the following details:
- First Name & Last Name - It is mandatory to enter the Last Name.
- Email - Enter the user's valid email address that is not already used to create a Client management system account.
An invitation will be sent to this email address. - Role- Choose the role of the user in your organization.
- Profile - Choose a profile that defines the access rights in Client management system account for the user.
You can add other details like phone numbers, address, photo, fax, website, date of birth, language, etc. after adding the user.
- Click Save.
The system sends an invitation to the user's email address. Only when the user accepts the invitation, will the status of the user change to Confirmed.

Modify Users
When you add a user, you will be specifying only the Name, Email address, Role and Profile details. You can add the other details of the user, such as, phone numbers, address, photo, fax, website, date of birth, language, etc. later whenever needed.
To modify a user's details
- Click Setup > Users & Permissions > Users.
- In Users page, click on the user from the list to modify the user details or add more information.
- In User's Details page, click Edit for the corresponding section in which you want to modify the user's details. You can provide the following details:
- Phone, Mobile, Website, Fax & Date of Birth - Enter these details of the user.
- Address Information - Enter the full address details.
- Language - Select a language and it will be set as the language for the user's Client management system account.

- Country Locale- Select your country from the list.
- Time Format - Choose 12 hour or 24 hour time format.
- Time Zone - The time zone that you select here will be the time set in your Client management system account.
- Click Save.
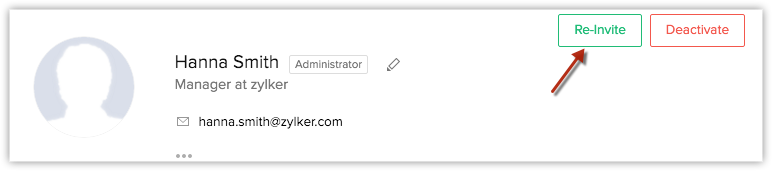
Re-Invite Users
When the users do not accept the invitation sent by the Administrator within 7 days, the Administrator can resend the invitation to the user. Users who have not accepted the invitation to join the organization's Client management system account will be listed under Unconfirmed Users. You can send an invite again only to the unconfirmed users. If the user is deactivated, you need to activate them.
To re-invite a user
- Log in to Client management system with Administrator privileges.
- Click Setup > Users & Permissions > Users.
- In the Users page, point your mouse to the user and click the Settings icon. Click Re-invite.
Alternatively, you can also go to the Unconfirmed Users view and select the user to re-invite. An invitation email will be sent to the user's email address.
| When you are invited to Company A's Client management system account and... | What you need to do |
| You do not have an existing Client management system account. | Click on the access link in the invitation email to join Company A's account. |
| You are already part of Company B's organization account. | Ask the Super Administrator of Company B's Client management system account to delete you from that account. Then click on the access link in the invitation email to join Company A's account. |
| You are already part of Company B's organization account. Also, you are the Super Administrator in the same account. | In Company B's Client management system account, make another user as the Super Administrator and ask the same user to delete you from that account. Then click on the access link in the invitation email to join Company A's account. |
| You are already part of Company B's organization account. Also, you are the only active user in the account. | Delete Company B's Client management system account and then click on the access link in the invitation email to join Company A's account. In this case, you Client management system account will be closed and all the data will be erased securely. An email will be sent to you with a link to download the final backup of your data. |
| You are already part of Client management system Docs/Client management system Mail | Ask the Administrator of Client management system Docs/Client management system Mail to delete you from the corresponding product's account. Then click on the access link in the invitation email to join Company A's account. |
| You are already part of Client management system Docs/Client management system Mail in Company B's organization account. Also, you are the Administrator of the account in these products. | In Company B's Client management system Docs/Client management system Mail, make another user as the Administrator and ask the same user to delete you from that account. Then click on the access link in the invitation email to join Company A's account. |
| You are already part of Client management system Docs/Client management system Mail in Company B's organization account. Also, you are the only active user in the account. | Delete Company B's Client management system Docs/Client management system Mail and then click on the access link in the invitation email to join Company A's account. In this case, you Client management system account will be closed and all the data will be erased securely. An email will be sent to you with a link to download the final backup of your data. |
Related Articles
Security Management-Manage Profiles
Create profiles that define the access permissions for the users. Set module-level and feature-level permissions for different profiles. Creating Profile While creating a profile, first you have to associate the existing profile to the new profile ...Manage list view
Standard List Views In the <Module> Home page, you can select the required list view from the View drop-down list. You can only rearrange the order of the columns or add more columns to the standard view modes. Some of the standard list views are: ...Manage Document Folders
Creating folders are the best way to manage and keep the documents organized. You can upload documents to these folders and share the folders with individual user, roles, subordinates and groups. To create a folder Click the Documents tab. In ...Manage Data Sharing
Managing Default Data Sharing Process You can provide the following types of access levels to user in Zoho CRM modules: Private: Only the record owner and his/her superior can view the record. Public Read only: Users can view others' records but ...Security Management- Mail Add-on Users
The Mail Add-on helps you to manage all the customer correspondence within your CRM account. It helps you to keep track of all the email communication between the customers and the CRM users. In addition to this, as an administrator, you have the ...