Managing Users
In CRM, a user is one who manages records, their own or those shared by other users, within the organization. In addition to accessing the CRM data, some of the users can perform administrative functions for smooth running of the CRM account.
Based on the editions and the user licenses, you can add users in CRM. In the Free Edition, you can add up to 10 users. In the other Editions, the number of users that you can add is based on the user licenses purchased. Each user can sign in to their account with an email address and password. Every user is given a role and profile. The profile determines what features a user is allowed to access and the role determines what data the user can access based on the organization's hierarchy.
Some of the Add-ons and Plug-ins in CRM needs to be enabled for users, for them to access the feature. For example, the Mobile Edition licenses, Mail Add-on, Plug-in for Microsoft Outlook, etc
Availability
![]() Profile Permission Required: Users with the Manage Users permission in profile can add/edit users.
Profile Permission Required: Users with the Manage Users permission in profile can add/edit users.
Types of Users
Administrators: Users who can accessing the entire system. There must be at least one Administrator for accessing the entire data and features in your CRM account. Example: CEO or any top officials or top management.
Standard Users: Users who can access data according to the defined permissions (profiles) and roles in the organization. For example: Sales Managers, Marketing Managers, Support Agents, etc.
Adding Users
Users with the Manage Users permission in their profile can access the users' list and perform tasks such as adding users, modifying the user details, and view the apps and add-ons that are activated for each user. The user's details page will also give you the information on the plug-ins and add-ons that are activated for the user.
Important Steps in Adding a User
Adding a users in CRM involves the following steps:
- The Administrator adds a user by providing some basic details like name, email address, role and profile.
- Once added, the system automatically sends an email invitation to the user's email address provided by the administrator. You can add other details such as phone numbers, address, photo, fax, website, date of birth, language, etc. after adding the user.
- The user accepts the invitation by clicking the Access link in the email within 7 days of receiving it.
- After accepting the invitation, the user completes any of the following, whichever is applicable:
- User is new to and does not have a account:
- After clicking the access link in the email, user will be redirected to the Sign up page.
- User will sign up and create an account
- On creating the account, user should click the Continue signing in button.
- The user has to confirm the email address by accessing the link sent in the Confirmation Email.
- User already has an account with, but does not have a CRM account:
- After clicking the access link in the email, user should click the Continue signing in button.
- The user will be logged in to the CRM account that is associated with the company's account.
- User is new to and does not have a account:
Add Users
In the Free Edition, you can add upto 10 users. In the other Editions, the number of users that you can add is based on the user licenses purchased.
Availability
![]() Profile Permission Required: Users with the Manage Users permission in profile can access this feature.
Profile Permission Required: Users with the Manage Users permission in profile can access this feature.
To add users
- Log in to CRM with Administrator privileges.
Users with Manage Users permission in the profile can also access this feature to add users. - Click Setup > Users & Permissions > Users.
- In the Users page, click Add New User.
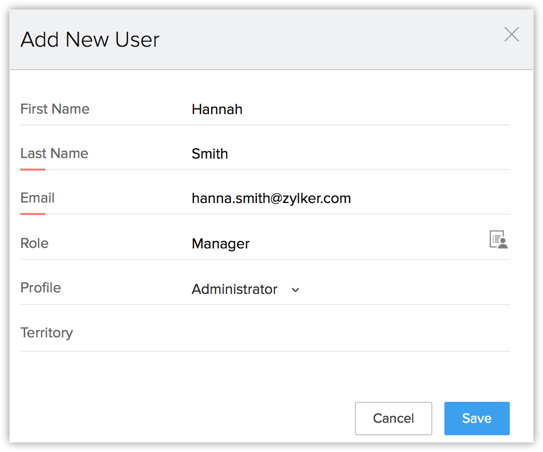
- In the Add New User page, enter the following details:
- First Name & Last Name - It is mandatory to enter the Last Name.
- Email - Enter the user's valid email address that is not already used to create a CRM account.
An invitation will be sent to this email address. - Role- Choose the role of the user in your organization.
- Profile - Choose a profile that defines the access rights in CRM account for the user.
You can add other details like phone numbers, address, photo, fax, website, date of birth, language, etc. after adding the user.
- Click Save.
The system sends an invitation to the user's email address. Only when the user accepts the invitation, will the status of the user change to Confirmed.
Modify Users
When you add a user, you will be specifying only the Name, Email address, Role and Profile details. You can add the other details of the user, such as, phone numbers, address, photo, fax, website, date of birth, language, etc. later whenever needed.
To modify a user's details
- Click Setup > Users & Permissions > Users.
- In Users page, click on the user from the list to modify the user details or add more information.
- In User's Details page, click Edit for the corresponding section in which you want to modify the user's details. You can provide the following details:
- Phone, Mobile, Website, Fax & Date of Birth - Enter these details of the user.
- Address Information - Enter the full address details.
- Language - Select a language and it will be set as the language for the user's CRM account.

- Country Locale- Select your country from the list.
- Time Format - Choose 12 hour or 24 hour time format.
- Time Zone - The time zone that you select here will be the time set in your Zoho CRM account.
- Click Save.
Re-Invite Users
When the users do not accept the invitation sent by the Administrator within 7 days, the Administrator can resend the invitation to the user. Users who have not accepted the invitation to join the organization's CRM account will be listed under Unconfirmed Users. You can send an invite again only to the unconfirmed users. If the user is deactivated, you need to activate them. See Also Activate Users
To re-invite a user
- Log in to CRM with Administrator privileges.
- Click Setup > Users & Permissions > Users.
- In the Users page, point your mouse to the user and click the Settings icon. Click Re-invite.
Alternatively, you can also go to the Unconfirmed Users view and select the user to re-invite. An invitation email will be sent to the user's email address.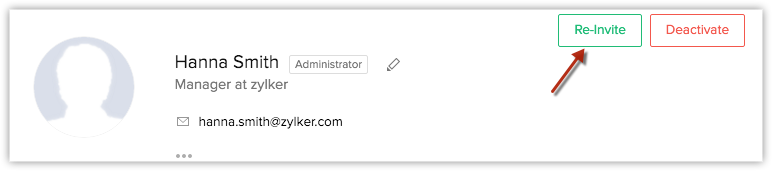
| When you are invited to Company A's CRM account and... | What you need to do |
| You do not have an existing CRM account. | Click on the access link in the invitation email to join Company A's account. |
| You are already part of Company B's organization account. | Ask the Super Administrator of Company B's CRM account to delete you from that account. Then click on the access link in the invitation email to join Company A's account. |
| You are already part of Company B's organization account. Also, you are the Super Administrator in the same account. | In Company B's CRM account, make another user as the Super Administrator and ask the same user to delete you from that account. Then click on the access link in the invitation email to join Company A's account. |
| You are already part of Company B's organization account. Also, you are the only active user in the account. | Delete Company B's CRM account and then click on the access link in the invitation email to join Company A's account. In this case, your CRM account will be closed and all the data will be erased securely. An email will be sent to you with a link to download the final backup of your data. |
| You are already part of Docs/Mail/Creator in Company B's organization account. | Ask the Administrator of Docs/ Mail/ Creator (of Company B) to delete you from the corresponding product's account. Then click on the access link in the invitation email to join Company A's account. |
| You are already part of Docs/Mail/Creator in Company B's organization account. Also, you are the Administrator of the account in these products. | In Company B's Docs/ Mail/Creator account, make another user as the Administrator and ask the same user to delete you from that account. Then click on the access link in the invitation email to join Company A's account. |
| You are already part of Docs/Mail/Creator in Company B's organization account. Also, you are the only active user in the account. | Delete Company B's Docs/ Mail/ Creator account, and then click on the access link in the invitation email to join Company A's account. In this case, your CRM account will be closed and all the data will be erased securely. An email will be sent to you with a link to download the final backup of your data. |
Activate/Deactivate Users
Sometimes in your organization, the users' hierarchical status may change or they may move to different business units. In such cases, you might have to deactivate those users after transferring ownership of the records to other users. Note that deactivating a user is different from deleting a user. When you deactivate a user:
- The user will no longer be able to access the CRM account.
- No one will be able to log into the service using the deactivated ID.
- You are free to use the same user license to add another user.
- The user license is not canceled. You will be billed for the number of user licenses that you had bought.
- The user will be listed under Deactivated Users.
- If you decide to activate the user again, you can re-invite the deactivated user.
To deactivate a user
- Log in to the CRM with Administrator privileges.
- Click Setup > Users & Permissions > Users.
- In the Users page, select the Active Users view. Point your mouse to the user you wish to deactivate and click the Settings icon. Click Deactivate.
The user will be deactivated and a system generated email will be sent to the corresponding user.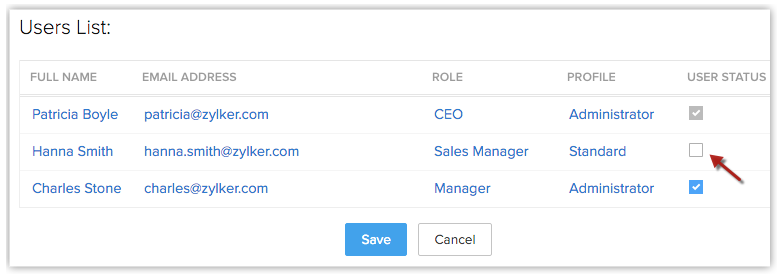
To activate a user
- Log in to the CRM with Administrator privileges.
- Click Setup Users & Permissions > Users.
- In the Users page, select the Inactive Users view.
- Move your mouse pointer to the user that you want to activate and click the Settings icon. Click Activate.
The user will be activated and a system generated email will be sent to the corresponding user.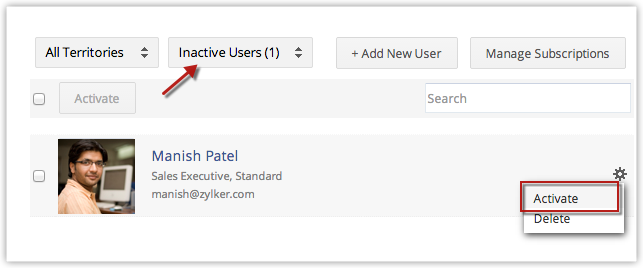
Note
- Only active users are counted towards user licenses.
Delete Users
When a member of your organization quits or is replaced you may have to delete the member from you CRM account. Note that deleting a user from CRM is not the same as closing their account. They are deleted only from CRM.
When you delete a user
- You cannot undo the action. If you don't want the member to access CRM but you are not sure about deleting the user, you can deactivate them.
- The records that belong to the deleted user remain in CRM. You can transfer them to another member at any time. It is recommended that you transfer the records before you delete a user. See also: How to mass transfer records.
- You cannot reinvite a deleted user. If you extend an invitation to a user you have deleted, the user will be added again in CRM as any other new user.
- Only the Super Admin of your account can delete a user.
- A user deleted from CRM will still be able to access other services without hassles with the same email address.
- All the integrations configured by the deleted user will be lost after you delete them.
- Deleting a user does not cancel the user's license. To cancel license you must manage your subscriptions.
To delete a user
- Click Setup > Users & Permissions > Users
- Point your mouse to the user and click the Settings icon.
- Click Delete.
Read the consequences of deleting a user and confirm the action. The user will be deleted from CRM and will appear under the Deleted Users view.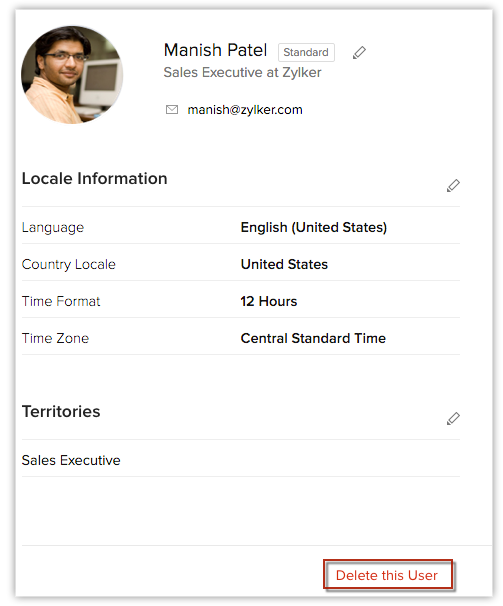
Reset Password
Users with any role can reset their password individually by clicking on the Forgot Password link in the login page.
To reset the password
- Click the Forgot Password link in the Log in page of CRM, the system redirects you to Accounts page.
- In Accounts page:
- Email ID: Specify the registered Email ID as mentioned in Account information.
- Image Text: Enter the code as seen in the given picture.
- Click Request.
The system sends an automated email to your Email ID. - Click the given link 'here' in the email, you will be redirected to Accounts Password Reset page.
- In Password reset page, enter your New Password.
- Click Change.
The new password is updated and you can use it to log in to all services.
Related Articles
Managing Profiles
Two profiles are provided by default: Administrator Profile: This profile has access to all the features in the Client management system account. Standard Profile: This profile has limited access to the features in Client management system account. ...Managing Roles
Create Roles By default, the CEO and Manager roles are enabled for your Client management system paid account. In addition, you can create different types of roles for users based on their position in your organization hierarchy and the type of ...Managing Groups
Group Members You can manage groups with the following combinations: Users: Only users. Roles: All users associated with the Roles can become members of the groups. Roles & Subordinates: All users associated with the roles and subordinate roles can ...Security Management-Managing Groups
Create groups to manage a common set of records with a group of members.,In CRM, you can create different types of groups (set of users) to manage a set of common records. Groups can be used for setting up team selling, team support, event management ...Security Management-Managing Roles
In CRM, you can set up the organization-wide hierarchy using Roles. Users at a higher hierarchy can always access all the records of at a lower hierarchy. For example, a Sales Manager can access all the Sales Reps' records whereas Sales Reps can ...