Reviewing a Spreadsheet
Versions and Version History
"Versions" is a feature available in Sheet that makes editing the sheet easy. When you edit a spreadsheet as you work, there are multiple changes made to the sheet. Sometimes, you wish to restore an earlier version of the sheet before certain changes were made. A user can revert to a previous version of the sheet by using this particular feature.
Create Version
Versions of a spreadsheet are created when a spreadsheet is edited or updated. Spreadsheets is capable of storing up to 100 different recent versions of the same spreadsheet automatically for your future reference. When a spreadsheet version is saved, it is provided with a time stamp in order to make it easier for you to access. The version number is created along with the time stamp. You can also choose to create named versions of the sheet. All the versions that were saved by you manually will be stored for your future reference.

To create Version:
1. Select File > Create Version from the drop down menu. A new version can also be created by naming an already saved version of the spreadsheet.
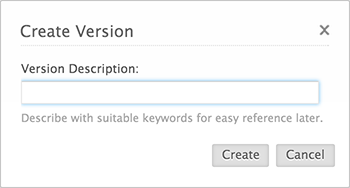
2. Give a name to the current version in the Create Version dialog box that appears.
3. Choose a name that is suitable to the data present in the sheet and the operations done.

4. You can also choose Create Version from Review in the toolbar.
View Version History
Version History helps the user to restore the version that he or she wishes to use.

To restore a version:
Method 1
-
Click File > View Version History from the drop-down menu.
Method 2
1. Click Review > View Version History.
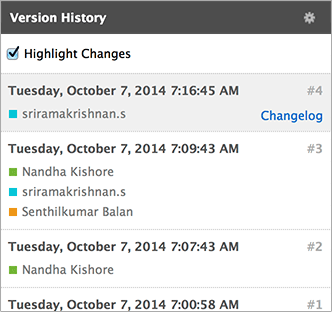
2. A menu opens up and it displays the various versions of the spreadsheet since it was created. When you click on a particular version of the spreadsheet,the sheet is displayed with in the version chosen along with the total number of edits made.
3. Click the check box near Highlight Changes to observe the changes that have been made.
4. You can choose to change the method in which the version histories are displayed. Click Settings ![]() icon next to Version History. Choose Show All Versions/ Show Named Versions according to your choice.
icon next to Version History. Choose Show All Versions/ Show Named Versions according to your choice.
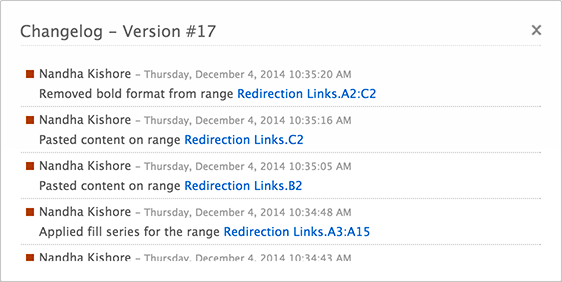
5. Click Change log to view the history of the cells which were modified. The Change log menu stores the complete history of the cells to have been edited. There is a link that is provided next to the change history of the cell that shows the current value held by the cell.

6. If you wish to use any of the earlier versions, choose that version and click Revert  in the toolbar. The version that you wanted to work with will be restored.
7. In order to name a previously unnamed version in Version History, select an unnamed version and click Name this Version on the toolbar.
Thus "Versions" is a useful tool when it comes to editing and formatting data.
Audit Trail
Audit Trail is a method that can be used to check the history of editing a document. Audit Trail can store up to 1000 edits that were done through individual cells. Audit Trail can be used to monitor the flow of data across versions by noting the edits made to the cells.
To use Audit Trail
1. Click Review > Audit Trail in the menu bar.

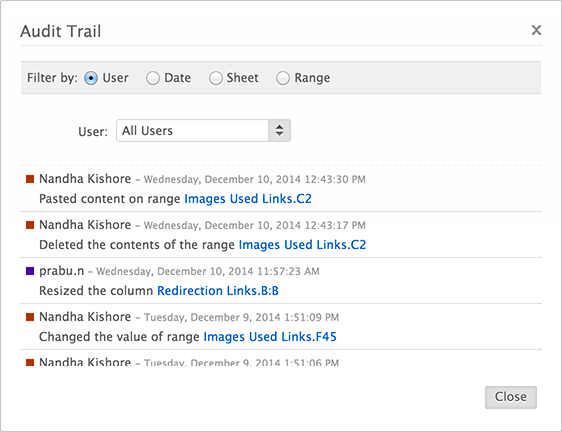
2. Audit Trail can be classified based upon different parameters. Use the options present on the top of the panel displayed in Audit Trail in order to sort the cell edit history based upon User, Date, Sheet or Range.
3. You can choose to look at the data according to the selected option. User lets you classify the edited cells based upon the person who edited them. Date classifies the cell history by the time in which they were edited. Sheet is an option that can be used to sort the existing data based upon which sheet they are present in and Range is used to display cells that fall under a certain range. You can also select the total cell range required.
Thus Audit Trail is helpful to track the way in which a spreadsheet was created and edited.
Related Articles
Tracking and Reviewing Changes
Use Track Changes Track changes is an essential feature that enables you to view the changes made by your collaborators. While collaborating on an online document, the owner of the document can enable the track changes mode, which then tracks all the ...Editing a Spreadsheet
Cell Formatting Text Color To change text color 1. On the Home Menu, click Text Color icon. 2. Choose the required font color. The selected font color is applied to the text. Cell Color To change cell color 1. Choose Fill Color icon from Home ...Sharing a spreadsheet
Share a spreadsheet To share a spreadsheet: 1. Click Share in the menu bar. 2. Enter the email addresses of the collaborators with whom you want to share the document. 3. You can allow the collaborator to only read the sheet (Read only), read and ...Creating and Saving a Spreadsheet
Create a New Spreadsheet Spreadsheets can be accessed from Docs. To create a new spreadsheet: Method 1: 1. To create a new spreadsheet directly from Docs main menu, click Create > Spreadsheet. ...Working with Data in a Spreadsheet
Sort Data Data can be sorted from the Data toolbar using Sort menu. To sort data Select the data that you wish to sort or arrange. Click Data > Sort. The options available under Sort include Sort Ascending Sort Descending Custom Sort Choose to sort ...