Security Management-Managing Roles
In CRM, you can set up the organization-wide hierarchy using Roles. Users at a higher hierarchy can always access all the records of at a lower hierarchy. For example, a Sales Manager can access all the Sales Reps' records whereas Sales Reps can access only their records.
Key Features
- Users with a CEO role have access to the entire database within your organization.
- Managers in the role hierarchy cannot view or edit their subordinates' records if they do not have the "Read" or "Edit" permissions for the type of record.
- Users at a higher role can access other users’ data below their hierarchy. For example: a Sales Manager can access his/her sub-ordinates' data.
- By default, users of the same role cannot access each others data. For example, the VP Engineering cannot access the VP Marketing data and vice versa though they are of the same hierarchy.
- By default, users at the top of the hierarchy cannot view the data shared to their subordinate users through custom sharing rules. However, you can enable access rights to the managers by using the Superiors Allowed option while creating data sharing rule.
- Using the Share Data with Peers option you can enable sharing of data among users of the same role.
- One must have read/write access to the primary record to add Notes, attachments or send email to it.
Availability
![]() Profile Permission Required: Users with the Manage Roles permission in profile can access this feature.
Profile Permission Required: Users with the Manage Roles permission in profile can access this feature.
Note
- You can create roles only if you have more than one user in your CRM account.
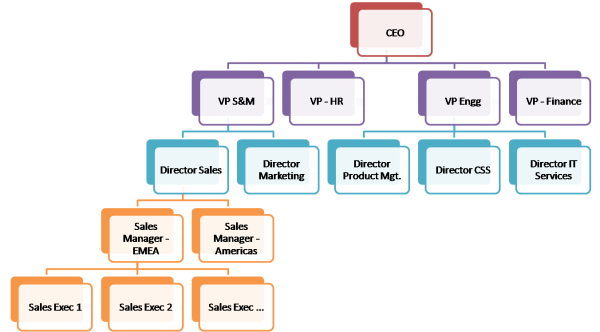
Sample Organizational Hierarchy
Model of the Organizational Hierarchy
Create Roles
By default, the CEO and Manager roles are enabled for your CRM paid account. In addition, you can create different types of roles for users based on their position in your organization hierarchy and the type of your CRM Edition
Note
- A user with an Administrator profile will have access to all the data irrespective of the role assigned to the user.
To create new roles
- Click Setup > Users & Permissions > Roles.
- In the Roles page, click New Role.
- In the New Role page, do the following:
- Enter the Role Name. Do not add a role with the same name.
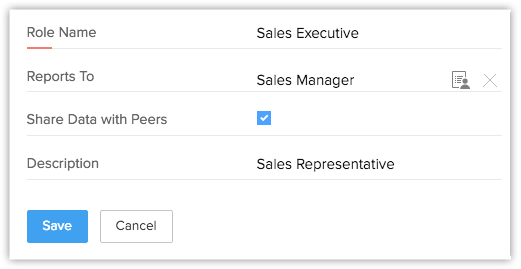
- Select the immediate superior's role from the Reports To lookup.
If you do not select the superior's role, the new role will be created under the CEO role. - Select the Share Data with Peers check box if you would like to enable access rights to peers.
- Specify the Description for the role.
- Enter the Role Name. Do not add a role with the same name.
- Click Save.
Note
- You can create roles only if you have more than one user in your CRM account.
Assign Roles to the Users
After creating roles, you can assign them to the users in your organization. A user with an Administrator profilewill have access to all the data irrespective of the role assigned to the user.
To assign roles to the users
- Click Setup > Users & Permissions > Users.
- In the Users page, click the <User Name>.
- In the User Details page, click Edit.
- Select the specific Role from the lookup box.
- Click Save.
Edit Roles
You can modify the user roles as per changes in your organizational hierarchy. As part of the modification of the roles, you can perform the following:
- Rename the role
- Change the Superior Role
- Change the setting for sharing data with Peers
While changing the role names, all the data sharing rules will be updated automatically. So you don't need to calculate the data sharing rules or update the user details.
Note
- A user with an Administrator profile will have access to all the data irrespective of the role assigned to the user
To edit a Role
- Click Setup > Users & Permissions > Roles.
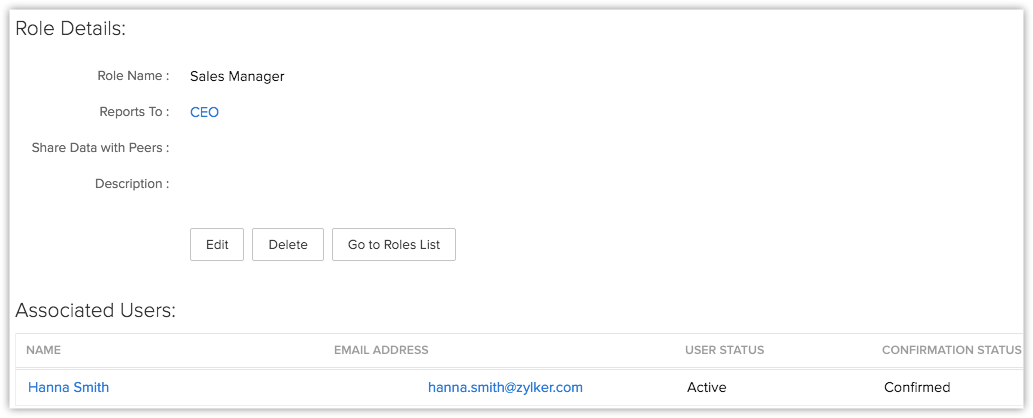
- In the Roles List, click the Role name.
- In the Role Details page, click Edit.
- In the Edit Role page, update the new properties for the role.
- Click Save.
Delete Roles
You cannot delete the existing roles without transferring the users to a new role.
To delete a Role
- Click Setup > Users & Permissions > Roles.
- In the Roles page, click the Role name.
- In the Role Details page, click Delete.
- In the Delete Role page, click on an existing Role to transfer the child-roles to the selected role.
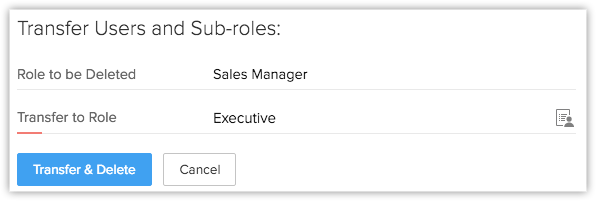
- Click Transfer & Delete.
Now the role and child-roles are transferred to the new role and a different organization hierarchy is created.
Related Articles
Security Management-Managing Groups
Create groups to manage a common set of records with a group of members.,In CRM, you can create different types of groups (set of users) to manage a set of common records. Groups can be used for setting up team selling, team support, event management ...Managing Roles
Create Roles By default, the CEO and Manager roles are enabled for your Client management system paid account. In addition, you can create different types of roles for users based on their position in your organization hierarchy and the type of ...Security Management
Managing the complexities of security administration is one of the growing concerns in any enterprise, especially those open to e-commerce and those with large networks. In such demanding times, the availability of Security Management is considered ...Security Management-Manage Profiles
Create profiles that define the access permissions for the users. Set module-level and feature-level permissions for different profiles. Creating Profile While creating a profile, first you have to associate the existing profile to the new profile ...Security Management-Data Sharing Rules
By default, access rights to CRM records is set as private so that the record owner and his/her manager can oversee the CRM data. However, using the Data Sharing Rules, you can extend the access rights to users belonging to other roles and groups. ...