Set up Autoresponders
Autoresponders are the solution to send automated replies and follow-up emails to the prospects and customers. Once you receive a response from the lead or contact, you have to manually exclude the contacts from the mailing list. See Also Autoresponder Scenario
Important:
- This feature is available only for the Leads and Contacts module.
- You can set a maximum of 3 autoresponders and a maximum of 5 follow-ups per autoresponder.
- You can send maximum 250 mass emails per day, per company.
- Custom view selected for the autoresponder must contain new data. If you select a custom view in which data is not new, autoresponder will send the first email to the same old data during subsequent iterations. For example, you can select custom views "Today's Leads" and "New This Week Contacts" instead of "All Open Leads" and "Recently Created Leads". In the Today's Leads view, data is always updated with the today's data whereas the data in All Open Leads view may not change frequently.
- While setting up Dynamic type Autoresponders, always select the Custom Views according to the options in the Recurrence Pattern section. If you set the recurrence pattern as By Day, make sure your data in the selected custom view is new every day. Similarly if you select By Week, your data must be a new one for that week before the autoresponder is initiated. If the data used is old, autoresponder will send the first email to the same data during subsequent iterations.
- While executing the autoresponder, system cannot identify the duplicate records. Hence, you are recommended to check for the duplicate contacts and merge with the primary record, before setting up the autoresponder.
- At present, you cannot track the response when customer responds to your email. Hence, you have to manually select the contacts from the mailing list to exclude them from the next follow-up.
- Use the unsubscribe form in the autoresponder email templates. By using unsubscribe form, you can allow the recipients to opt out from your next follow-up and avoid Anti-SPAM complaints. See Also Setting up Unsubscribe Form
To set up autoresponders
- Click the Leads/Contacts tab.
- In the Leads/Contacts Home page, click Leads/Contacts Tools > Autoresponders.
- In the Autoresponders page, click Create Autoresponder.
- In the New Autoresponder page, under the Autoresponder Details section, do the following:
- Enter the Name of the autoresponder.
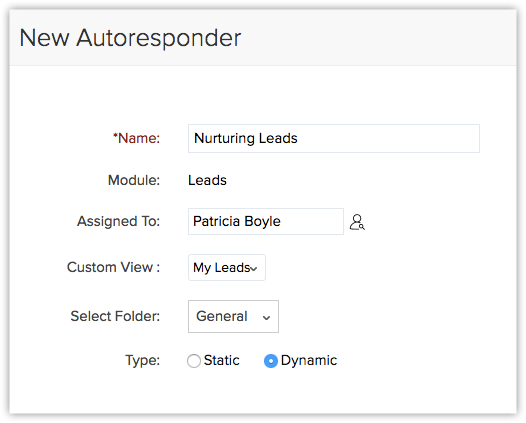
- Select the owner of the records from the Assigned To pick list.
By default, the field displays the name of the user who creates the autoreponder. - Select the Custom View to set up the recipient list for the autoresponder.
- Select a Folder for the autoresponder.
- Select Static or Dynamic and specify the corresponding details. (Refer the table for the list of standard fields)
- Static- Autoresponder in which the Follow-up happens on a fixed date.
- Dynamic - Autoresponder in which the Follow-up happens on predefined intervals set by you.
- Enter the Name of the autoresponder.
- Click Save.
Note
- The autoreponder email will not be sent to the records for which the Email Opt Out is enabled.
- Only when you clear the Email Opt Out check box in the Record's Details page, the autoresponder emails will be sent to those records.
The following table gives the list of fields and their description when Static option is selected.
| Fields | Description |
| Follow-up Date | Specify the follow-up date. The follow-up date is calculated with respect to the day when the autoresponder is initiated. |
| Email template | Choose the template from the drop-down list. |
The following table gives the list of fields and their description when Dynamic option is selected.
| By Day -Fields | Description |
| Recur every ___ day(s) | Enter how often in days the autoresponder should be repeated. |
| Recur everyday | Select this if the autoresponder should be repeated everyday. Select the Start date (MM/dd/yyyy format) and time for the autoresponder. |
| End by | Select the End date for the autoresponder in MM/dd/yyyy format. |
| No end date | Select this if the autoresponder should continue repeating till you specify an end date. |
| Choose Email Template | Choose the template from the drop-down list. |
| Add Follow-up | Click the link to add follow-ups for the autoresponder. Example: The autoresponder is initiated on 01-01-2010 and the follow-up dates specified areAfter 3 days and After 10 days. In such a case, the first follow-up email will be sent on 04-01-2010 and the second follow-up email will be sent on 11-01-2010. |
| By Week -Fields | Description |
| Recur every ____week(s) on S-M-T-W-T-F-S | Enter how often in weeks the autoresponder should be repeated. Then, select the checkbox(es) that correspond to the day(s) of the week on which the recurrence should occur. |
| Start by | Select the Start date (MM/dd/yyyy format) and time for the autoresponder. |
| End by | Select the End date for the autoresponder in MM/dd/yyyy format. |
| No end date | Select this if the autoresponder should continue repeating till you specify an end date. |
| Choose Email Template | Choose an email template for the autoresponder from the drop-down list. |
| Add Follow-up | Click the link to add follow-ups for the autoresponder. Example: The autoresponder is initiated on 01-01-2010 and the follow-up dates specified areAfter 3 days and After 10 days. In such a case, the first follow-up email will be sent on 04-01-2010 and the second follow-up email will be sent on 11-01-2010. |
| By Month -Fields | Description |
| Day __ of every ___ month(s) | Enter how often in months and on the specified date the autoresponder should be repeated. |
| ____ ____ of every month | Select a particular day when the autoresponder should be repeated every month. |
| Start by | Select the Start date (MM/dd/yyyy format) and time for the autoresponder. |
| End by | Select the End date for the autoresponder in MM/dd/yyyy format. |
| Choose Email Template | Choose an email template for the autoresponder from the drop-down list. |
| Add Follow-up | Click the link to add follow-ups for the autoresponder. Example: The autoresponder is initiated on 01-01-2010 and the follow-up dates specified areAfter 3 days and After 10 days. In such a case, the first follow-up email will be sent on 04-01-2010 and the second follow-up email will be sent on 11-01-2010. |
Create Folders
In CRM, you can create various folders for a better organization of your autoresponders. This helps you to keep them classified under different categories for quick access.
To create folders
- Click the Leads/Contacts tab.
- In the Leads/Contacts Home page, click Leads/Contacts Tools > Autoresponders.
- In the Autoresponders page, click Create Folder.
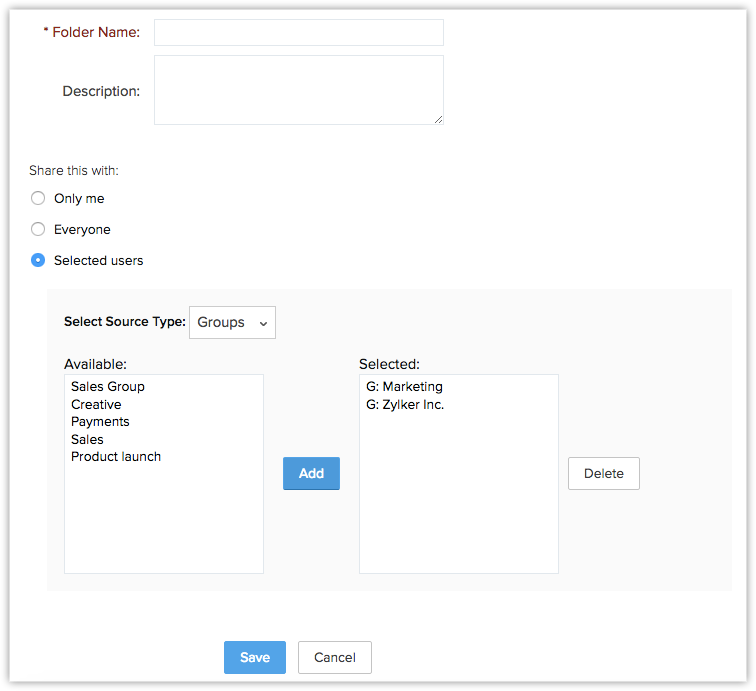
- In the Create Folder page, do the following:
- Enter the Folder Name.
- Enter the Description.
- Under Accessibility Details, select the option to specify the accessibility to the autoresponder feature.
- Click Save.
Related Articles
Autoresponders
Set up Autoresponder Autoresponders are the solution to send automated replies and follow-up emails to the prospects and customers. Once you receive a response from the lead or contact, you have to manually exclude the contacts from the mailing list. ...Set Currency
Currency settings are an organization specific feature. By default, the currency is set to US dollars ($). However, user(s) with Administrator privilege can change the currency settings depending on the organization's requirement. Based on the ...Set Discount
While creating price book information, you have an option to choose your Pricing Model based on your business requirement. You can choose from the following options: No discount Flat Discount Differential Discount To define the pricing model with no ...Set Your Own Filters
There are two options available that allows you to set your own filters to list the visitors visiting your website.Set user idle time
You can now select a time from the list to set the inactive period for an user to set the status to idle.