Sharing a spreadsheet
Share a spreadsheet
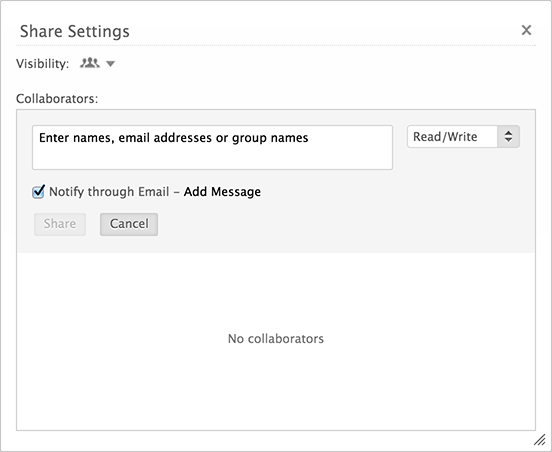
To share a spreadsheet:
1. Click Share in the menu bar.
2. Enter the email addresses of the collaborators with whom you want to share the document.
3. You can allow the collaborator to only read the sheet (Read only), read and edit the sheet (Read/Write) or let the collaborator share the document along with editing (Co-Owner)
You can set the visibility of the sheet as follows:
-
Collaborators only - Lets only the people with whom you shared see the document
-
Everyone in the Organization - Members within a specific organization can view it.
-
Password protected - Only those with the password can access the spreadsheet.
-
Public - Anyone can view it.

Collaborators
Collaborators are the persons with whom the spreadsheet is shared.
To view collaborators:
1. Click Share > Collaborators.
2. Use Notify Collaborators present within Share option to send a mail to your collaborators.
Publish Spreadsheet
A spreadsheet can be published within an organization or be made public to be viewed by everyone.
To make a spreadsheet public:
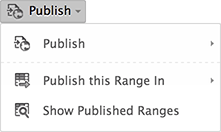
1. Click Publish from the menu and choose whether to publish to everyone or within the organization. You can also choose to allow others to export the sheet and to hide your formula cells by using the check boxes provided.
2. Click Publish Range In from Publish to publish only a range of cells present within the spreadsheet and choose whether you want to publish internally or externally.
3. To view the published ranges, use Show Published Ranges present within Publish displays the portions or the ranges of the cells which are published.

Embed Spreadsheet
A spreadsheet can be embedded within your blog or web page by using the option Embed provided in the menu.
To embed the spreadsheet in your webpage:
1. Click Share > Embed.
2. Choose whether to publish in an internal site or external site.
3. Copy and paste the HTML code snippet provided in order to publish the sheet in your blog.

Related Articles
Creating Data Sharing Rules
This feature helps you to create rules to provide access or restrict users from viewing your data in various modules. Availability Profile Permission Required: Users with the Manage Data Sharing permission can access this feature. To create data ...Document Sharing and Collaboration
Sharing Options This section the various way in which you can collaborate with your team and work on documents together. Collaboration enables you to work on documents together even if your team members are spread across locations. Share Documents ...Manage Data Sharing
Managing Default Data Sharing Process You can provide the following types of access levels to user in Zoho CRM modules: Private: Only the record owner and his/her superior can view the record. Public Read only: Users can view others' records but ...Editing a Spreadsheet
Cell Formatting Text Color To change text color 1. On the Home Menu, click Text Color icon. 2. Choose the required font color. The selected font color is applied to the text. Cell Color To change cell color 1. Choose Fill Color icon from Home ...Reviewing a Spreadsheet
Versions and Version History "Versions" is a feature available in Sheet that makes editing the sheet easy. When you edit a spreadsheet as you work, there are multiple changes made to the sheet. Sometimes, you wish to restore an earlier version of the ...