Workflow Rules/Alerts
Workflow Rules in CRM, are a set of actions (alerts, tasks and field updates) that are executed when certain specified conditions are met. These rules automate the process of sending email alerts, assigning tasks and updating certain fields of a record when a rule is triggered. A workflow rule consists of the following elements:
- Basic Details - Specify details on the record type for which the rule applies, rule name, description, and option to activate the rule.
- Rule Trigger- Specify when the rule should be triggered for a record and based on what. There are two options:
- Execute based on a record's action - Rules can be triggered when records are created, edited, created/edited, deleted or a specific fields are updated.
- Execute based on a date field's value - For all the records matching the rule criteria, rule will be triggered either monthly or yearly based on the value of the date field that is selected.
- Rule Criteria - List out the criteria to filter out records that meet the criteria. Workflow rule is triggered to these records.
- Instant Actions - Add alerts, tasks, field updates, webhooks and custom functions that will be triggered immediately when the rule is executed. On Edit or Field Update actions, you can also convert Leads, Quotes or Sales Orders.
- Time Based Actions - Add alerts, tasks, field updates, webhooks and custom functions that will be scheduled and triggered based on a specified time.
Create Workflow Rules
The steps to create a workflow rule are divided into 4 parts.
Part 1 - Specify the basic details of the rule
- Click Setup > Automation > Workflow > Rules.
- In the Workflow Rules page, click Create Rule.
- In the New Rule page, do the following:
- Select the Module to which the rule applies from the drop-down list.
- Enter the Rule Name.
- Click the Lock/Unlock icon next to the rule name.
Only Administrators can lock/unlock a workflow rule. This option is available so that others user are not able to edit or delete the rule. If required others can clone the workflow rule. - In the Lock Rule pop up, specify the reason to lock the rule and click Yes, Lock.
- Click the Lock/Unlock icon next to the rule name.
- Select the Status check box if you want the rule to be active.
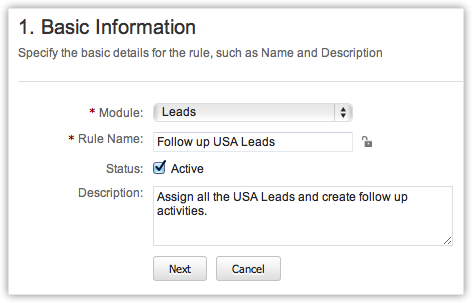
- Enter the Description for the workflow rule.
- Click Next.
Part 2 - Select rule trigger option
There are two options based on which the rule will be triggered for a record that matched the rule criteria. One of these options need to be selected when you create a workflow rule and you cannot change it later by editing the rule. The two options from the Execute based on drop-down list are:
- A Record Action - Rules can be triggered when records are created, edited, created/edited, deleted or a specific fields are updated.
- A Date Field's Value -For all the records matching the rule criteria, rule will be triggered either monthly or yearly based on the value of the date field that is selected. This option is available only in the Enterprise Edition.
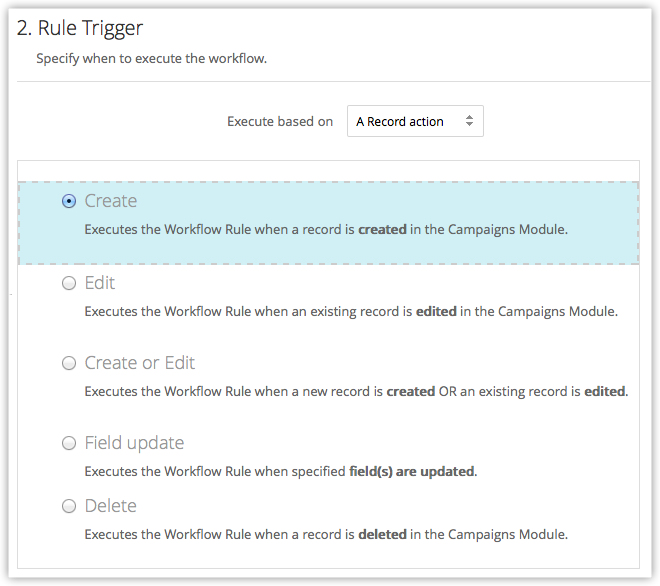
Execute Based on Record Action
When new leads are created in CRM you may want to automatically send an email or a series of emails at set intervals. You may also want to create tasks for these new leads. Also, sometimes when specific fields are updated, you may want to trigger a workflow. This execution option lets you specify an action (Create, Edit, Delete, etc.) based on which workflow rules will be triggered.
- Select one of the following:
- Create: Executes the rule when records are created.
- Edit: Executes the rule when existing record are modified.
- Create or Edit: Executes the rule when records are created or existing records are modified.
- Field Update: Executes the rule when the values of the specified fields are modified in a record.
- Delete: Executes the rule when certain records are deleted. Only Workflow Alerts and Webhooks can be associated for such a rule. The action includes:
- Deleting a record from the Details Page.
- Deleting from the List View (One by one or in bulk).
- Using the Mass Delete feature.
- Deleting from a record's Related List. For example, deleting a contact under an Account.
- When you select the Field Update option, do the following:
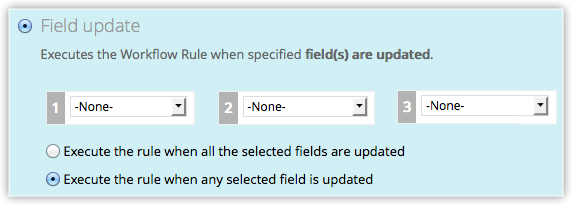
- Choose the field name from the drop-down lists.
- Choose one of the following:
- Execute the rule when all the selected fields are updated.
- Execute the rule when any selected field is updated.
- Click Next
- When you configure a workflow rule for the Visits module, you will see only the Create rule trigger. The other rule triggers like Edit, Field Update etc are not available for the Visits module.
- When Workflow Actions are configured on creation of Visits, those actions will be executed for the leads/contacts associated with the Visit and not for the Visit itself. For example, when alerts are configured for the visit, the emails are sent to the leads/contacts associated with the visit. Similarly a task created on the creation of the visit is assigned to the record owner of the associated lead/contact.
- Choose a Date field from the drop-down list.
All the date fields in the module for which the rule is being created will be listed. - Choose On, Before or After from the drop-down list to set the Date of Execution.
The rule can be set to trigger a maximum of 90 days Before or After the Date field specified. - Specify the time of execution in hours and minutes.
In case of DateTime fields, there is an option to trigger the rule based on the time in the field value.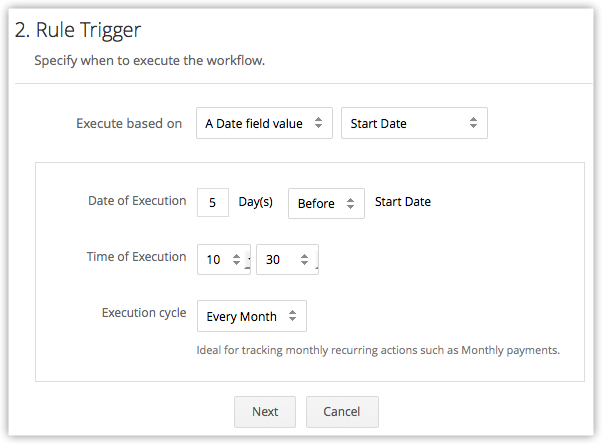
- Select the Execution cycle as Once, Every Month or Every Year.
- Click Next.
Part 3 - Set the rule criteria
- In the Rule Criteria section, specify the rule criteria details.
- Click Add Criteria to add multiple criteria.
- Click Next.
To edit criteria patterns
- Click Setup > Automation > Workflow > Rules.
- In the Workflow Rules page, click on a workflow rule.
- In the Edit Rule page, review your existing criteria and click the Change Pattern link.
- In Pattern Editor box, modify filters and click the Save link.
- Save the modified custom view.
Example:
You would like to trigger a workflow rule for all the potentials whose Type is New Business, Stage is Need Analysis or Qualification, and Amount is above $50000.
Type is New Business; Stage is Need Analysis or Qualification; and Amount > $50000.
You can create this criteria easily using the Criteria option given below: 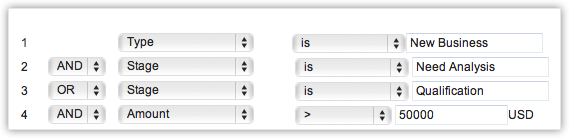
The criteria pattern will be automatically set as: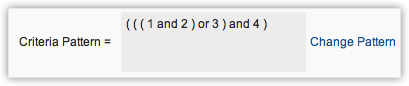
Since the criteria pattern does not match the requirement, you can edit it as: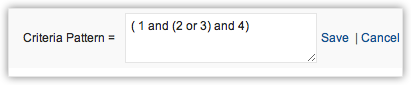
You can use the following characters in the Criteria Pattern Editor:
- Round brackets: ( )
- and / or operators
- Criteria Row Number
Important Notes
- When the Change Pattern box is being used to edit, you cannot add or delete a criteria row under the Specify Criteria section.
- The operator precedence will not be taken into account if you do not specify brackets. For example, if you specify the criteria as 1 or 2 and 3, it will be considered as ((1 or 2) and 3)
- You can change the and or or of the criteria rows and it will be updated in the Editor below.
- You can change the and or or condition in the pattern and it will be updated in the rows above.
- If you specify 1 and 2 and save it, on editing the view the pattern will be shown as (1 and 2). For (1 and 2) or 3 the pattern will be shown as ( (1 and 2) or 3 )
- If you add more rows in the editor and delete one by one there will be additional brackets displayed in the pattern. For example if there are 4 rows added and you delete the 3rd row, the criteria pattern will be as ( ( ( ( 1 and 2 ) ) ) or 3 ). If the first row is deleted then it will be shown as ( ( ( ( 1 ) ) ) or 2 ). However, on saving the criteria, it will change as ( 1 or 2 ).
- Make sure that you do not use the following as they are invalid: (), (and), (or).
- If the brackets do not match it will be treated as invalid.
- There will an error message, if the number of rows and the numbers given in the pattern do not match and also, if there are any numbers missed in the pattern.
- In case the final brackets are missing, there will be a difference in the Criteria Patterns Editor and its view mode.
Your Criteria Pattern in Editor Your Criteria Pattern in View Mode ( 1 and 2 ) or ( 3 and 4 ) (( 1 and 2 ) or ( 3 and 4 )) 1 and 2 and 3 and 4 (1 and 2 and 3 and 4 ) ( 1 or 2 ) and ( 3 or 4 ) ( ( 1 or 2 ) and ( 3 or 4 ) )
Part 4 - Associate instant and/or time based actions
Workflow rules are meaningful only if an alert, task, field update, webhook or custom function is associated to the rule. They are grouped under Actions that can either be Instant Actions or Time Based Actions. These actions once created, can be associated with many rules.
- In the Actions section, do the following:
Note that you cannot save a rule without creating either an instant or a time based action.- Create Instant Action by associating alerts, tasks, field updates, webhooks or custom functions. See AlsoCreate Instant Actions
- Create Time Based Actions and associate alerts, tasks, field updates, webhooks or custom functions. See Also Create Time Based Actions
A maximum of 5 time based actions can be created.
- Click Save.
Note
- For each action, you can associate a maximum of 5 alerts, 5 tasks, and 3 field updates.
- You can associate up to 6 (1 Instant Action and 5 Time-Based Actions) custom functions per workflow rule. Similarly, you can associate up to 6 (1 Instant Action and 5 Time-Based Actions) webhooks per workflow rule.
- A maximum of 5 Time Based Actions (that includes alerts, tasks, field updates, webhooks and custom functions) can be created for a rule.
- If your CRM account is downgraded or the subscription expired, the workflow rules will be disabled. If you renew the subscription, you will need to manually enable the rules.
To create time based actions
If you are creating a workflow rule, directly go to step 4
- Click Automation > Workflow > Rules.
- In the Workflow Rules page, click on the rule for which you want to create an action.
- Click Edit to modify the rule settings.
- Under the Actions section, click Add a Time Based Action.
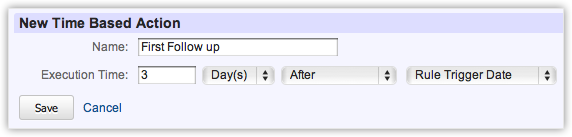
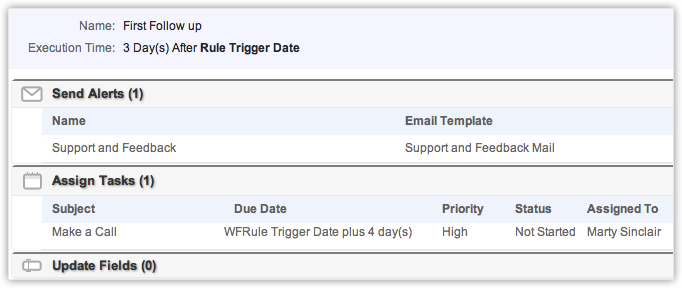
- Enter a Name for the time based action.
- Specify the Execution Time, i.e. when the associated actions should be triggered.
- Click Save.
- Under Time Based Actions section, do the following to associate alerts, tasks, field updates, webhooks or custom functions to the rule:
- In the corresponding section, click
 (the Add icon), specify the details to create a record and associate it to the rule.
 - In the corresponding section, click
 (the Associate icon), select an existing record and associate it to the rule.
- In the corresponding section, click
- Click Save.
Related Articles
What are Workflow Rules, Workflow Alerts, Workflow Tasks & Workflow Assignment Values?
Workflow Rules Workflow Rule helps you to specify, when a workflow should be triggered & be executed ( based on criteria ). Workflow Alerts Using Workflow Alerts you can send automatic pre-defined e-mail notifications when a workflow is executed. ...How can I disable workflow rules for Standard users?
Workflow rules can be defined by any user who has the 'Manage Workflow' permission. By default, the Standard profile user also has this permission and you cannot change it. However, you can create another profile without the 'Manage Workflow' ...How can I disable workflow rules for Standard users?
Workflow rules can be defined by any user who has the 'Manage Workflow' permission. By default, the Standard profile user also has this permission and you cannot change it. However, you can create another profile without the 'Manage Workflow' ...How can I disable workflow rules for Standard users?
Workflow rules can be defined by any user who has the 'Manage Workflow' permission. By default, the Standard profile user also has this permission and you cannot change it. However, you can create another profile without the 'Manage Workflow' ...Can I associate a Workflow Alert or Task or an Assignment value to multiple Workflow Rules?
Yes, you can associate a Workflow Alert or Workflow Task or Workflow Assignment Value to multiple Workflow Rules.