Inventory Templates
Inventory Modules
You can select the following primary modules and create templates by linking with other secondary modules:
- Quotes: Quotes, Products, Users, Organization, Accounts, Contacts, and Potentials.
- Purchase Orders: Purchase Orders, Products, Users, Organization, Vendors, and Contacts.
- Sales Orders: Sales Orders, Products, Users, Organization, Accounts, Contacts, and Potentials.
- Invoices: Invoices, Products, Users, Organization, Accounts, Contacts, and Potentials.
Special Instructions
- In the Inventory Template, "Product Name" is a mandatory field. If you are not adding this field products will not be listed.
- Ensure that tags for line items are present within <tbody id="lineItem"> and </tbody> tags.
- Use the ${companyLogo} tag for embedding your Company Logo in a template.
- In addition to Inventory modules, you can merge fields from Users, Organization, Accounts, Vendors, Contacts, and Potentials modules in the template.
- A default template will be used in Print Preview, Export to PDF and Send Mail functions of Quotes, Orders, and Invoices.
Inventory Template Tags
While creating a template, you can use various tags from Users, Organization, Accounts, Contacts, Potentials, Vendors, Quotes, Sales Orders, Invoices, and Purchase Orders modules.
List of Standard Fields
| Field Name | Tag | Description | Data Type |
| First Name | ${User.First Name} | Specify the first name of the user. | Text box |
| Last Name | ${User.Last.Name} | Specify the last name of the user. This field is a mandatory field. | Text box |
| ${User.Email} | Specify the official E-mail ID of the user. This is a mandatory field. | URL | |
| Phone | ${User.Phone} | Specify the official phone number of the user. | Pick list |
| Mobile | ${Mobile} | Specify the mobile phone number of the user. | Text box, integer value |
| Fax | ${User.Fax} | Specify the FAX number of the user. | Text box |
| Street | ${User.Street} | Specify the primary address of the Zoho CRM user. | Text box |
| City | ${User.City} | Specify the name of the city where the user lives. | Text box |
| State | ${User.State} | Specify the name of the state where the user lives. | Text box |
| Zip | ${User.Zip Code} | Specify the postal code of the user's address. | Text box, integer value |
| Country | ${User.Country} | Specify the name of the user's country. | Text box |
List of Organization-Related Tags
| Field Name | Tag | Description | Data Type |
| Name | ${Organization.Organization Name} | Specify your company name. | Text box |
| Phone | ${Organization.Phone} | Specify the official phone number of your company. | Text box |
| Mobile | ${Organization.Mobile} | Specify the mobile number of your company. | Text box |
| Fax | ${Organization.Fax} | Specify the FAX number of your company. | Text box |
| Website URL | ${Organization.Website} | Specify your company Website URL. | URL |
| Street | ${Organization.Street} | Specify the primary address of your company. | Text box |
| City | ${Organization.City} | Specify the city in which your company is located. | Text box |
| State | ${Organization.State} | Specify the state in which your company is located. | Text box |
| Postal Code | ${Organization.Zip Code} | Specify the postal code of your company address. | Text box |
| Country | ${Organization.Country} | Specify the name of the country in which your company headquarters is located. | Text box |
| Company Logo | ${companyLogo} | Upload your company logo, which can be used as header in your quotes, orders, and invoices similar to letterhead. Maximum allowed size 188 x 80 px. | Browse Image |
| Description | ${Organization.Organization Description} | Specify your company information. | Text Area |
Customize Inventory Template
To customize an inventory template
- Click Setup > Templates > Inventory Templates.
- In the Inventory Templates home page, click New Template.
- In the Select Template Module page, select the module from the Record Type drop-down list.
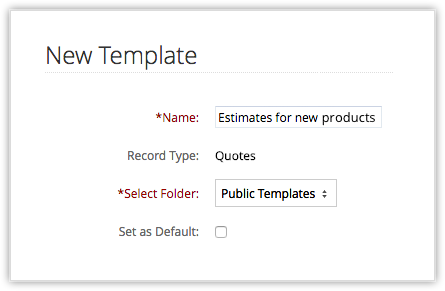
- In the New Templatepage, do the following:
- Specify the Name of the Email template.
- Select Folder from the drop-down list.
- Select Set as Default check box, if required.
- Create the Template by incorporating the fields from modules. In the Template Body field, specify the following:
- Select the type of field from the Field Type pick list. You can select fields related to the module.
- Select the required fields from the Available Merge fields drop-down list.
- Copy the fields (for example, ${Quotes.Account Name}) from the Select Field drop-down list. Copy the field value displayed in Copy Merge Field value text box and paste in Template Body text area.
Note:
- You can create a template with less than 32000 characters. If the template contains more than 32000 characters, extra characters will be truncated.