Store Files Online
1. Drag & Drop Upload :
You can easily upload your files and folders to Docs by just dragging and dropping them into the destination folders.
To Start the Drag & Drop Upload :
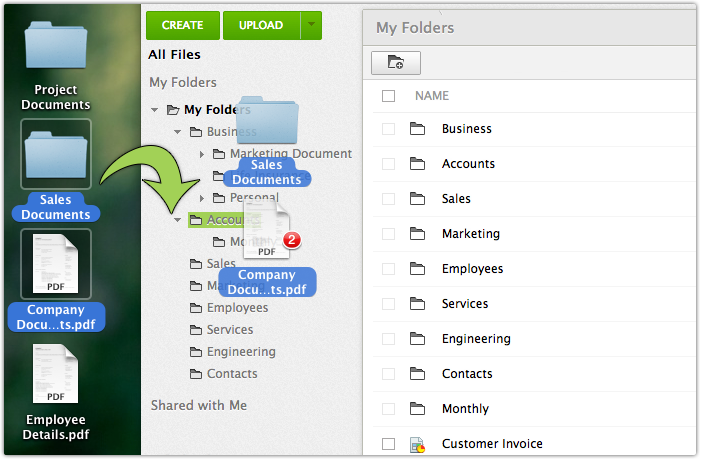
- Select the files or folders you would like to upload.
- Drag the Files or Folders from your computer and drop them into the destination Folder in Docs
- In the upload confirmation box (which will pop up once you drop the files) click on the 'Start' button to start the upload.
Note:
- The Drag & Drop upload supports up to 100 files at a time and each file can be of size up to 10 GB (based on the subscription plan type). To upload larger files, please use the Bulk upload option.
2. Uploading Files :
Using the file upload option, you can quickly upload files to your Docs account from your computer. You can upload up to 100 files at a time and each file can be of size up to 10 GB based on the subscription plan (To upload larger files, please use the Bulk upload option).
To start the File Upload :
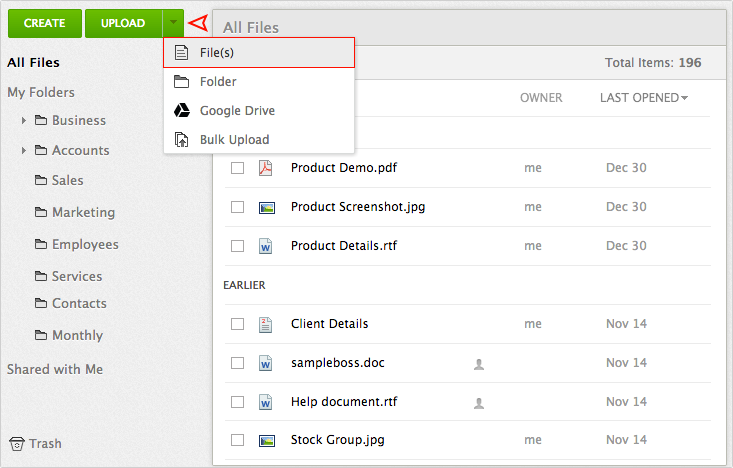
- Click on the 'Upload button' at the left top of the page.
- Choose the files in your computer (max of 100) and click on 'Open'.
- The upload confirmation box will appear.
- You can change the destination folder by clicking on the 'Click here' link.
- Leave the check box checked, if you want your files to be converted to the corresponding Online format (click here to know more about the conversions).
- Click on 'Start Upload' to start the upload.
Once you click on 'Start Upload' the files will be uploaded & stored in the chosen folders.
3. Uploading Folders :
Using the folder upload option, you can upload folders with files and sub-folders, directly to the folders in Docs. If the folder you have chosen to upload, contains any sub-folders, the whole folder directory will be uploaded.
To start the folder upload :
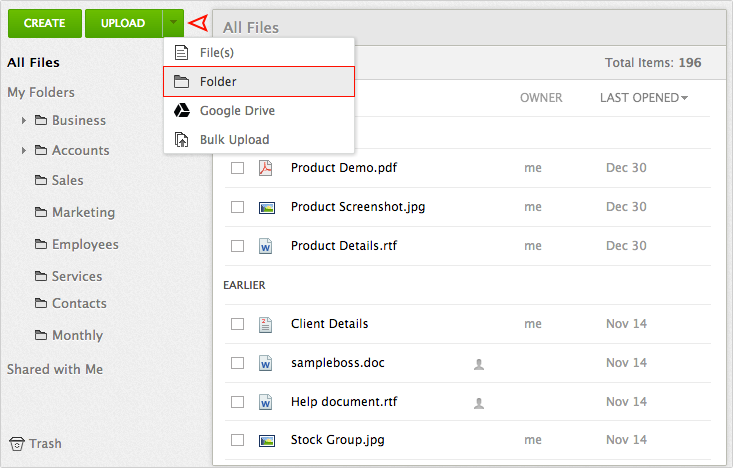
- Click on the down arrow in the upload button and choose 'Folders'
- Choose the folder from the computer and click 'Okay'
- Click 'Start Upload' to start the upload.
Note:
- As of now, the Folder upload is supported only for Google Chrome browser.
4. Bulk Upload :
Docs' 'Bulk Upload' option can be used when there is a need to upload large files. You can upload up to 500 files at a time and the size of each file can be up to 10 GB based on the subscription plan.
To start the Bulk Upload :
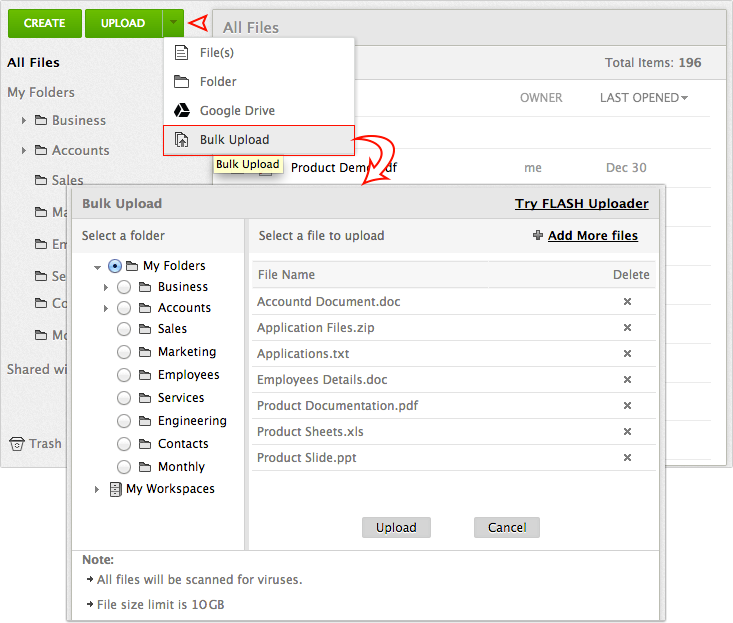
- Click on the down arrow in the upload button and choose 'Bulk Upload'
- A new tab will be opened.
- In the left side of the page, choose the destination folder (where the files are going to be stored).
- Click on the 'Select files to upload' option and choose the files from your computer.
- To start the upload, click on the 'Start Upload' button.
Once the upload is complete, you can go back to your Docs home page and refresh the page to see the newly uploaded files.
5. Zip upload :
If you would like to upload all of your data (files and folders) at one shot, then the Zip upload would be the right choice.
To do the Zip upload :
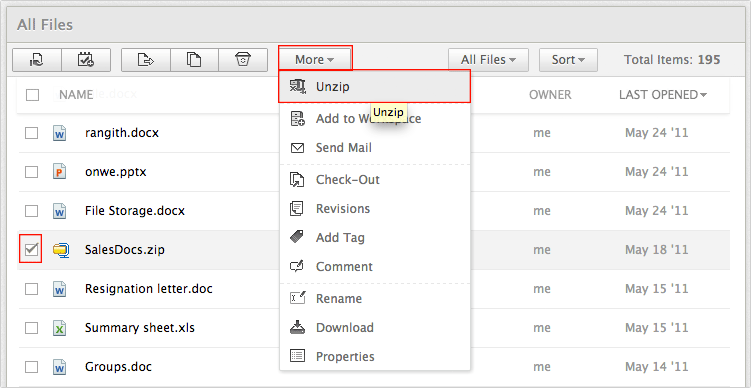
- Zip the folders and files in to a single file in your computer.
- Upload the Zip file to Docs using the File upload or the Bulk Upload
- Once the upload is completed, choose the uploaded Zip file in Docs and click on the 'Actions' button at the tool bar (or do a right click on the file).
- Click on 'Un Zip' and the files will be unzipped.
6. Importing your Google Documents :
If you are a Google Docs / Apps user and if you have documents stored in your Google docs account, you can easily import them using the Google Import option.
To start the import :
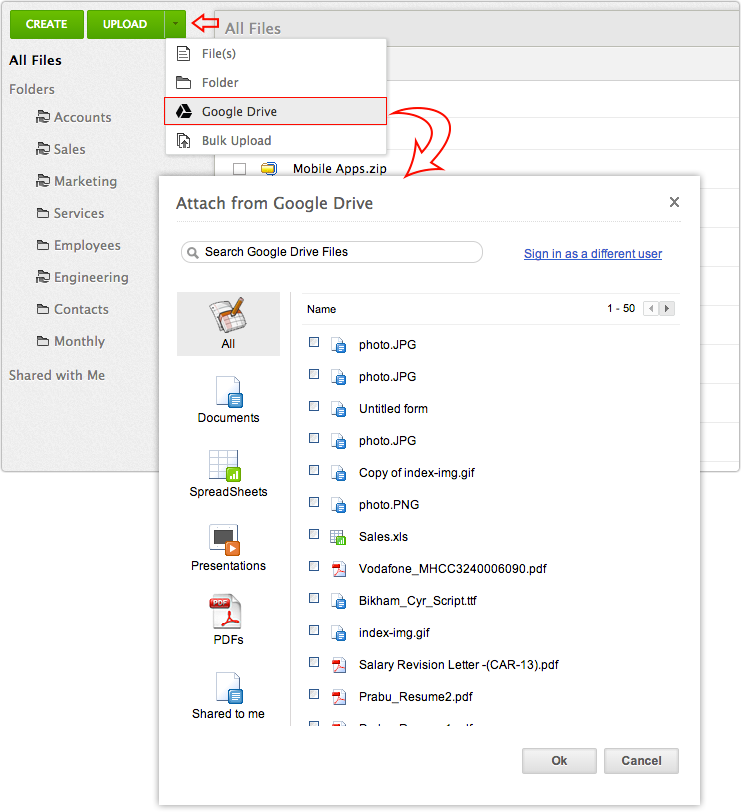
- Click on the down arrow in the upload button and choose 'Google Drive'
- Click on the 'Authenticate Google' button
- Sign in with your Google account
- Click on the 'Grant Access' button
- Choose the documents to import and click 'Ok'
The import will be scheduled and your files will appear in your Docs account.
7. Email In :
Docs' "Email-in" feature allows you to email files from your existing mail Accounts directly to your Docs Account without the need to login.
How does it work?
"Email-in" feature in Docs, provides you a secure email address. Documents mailed to this secure email address will be transferred directly to the 'My folders' section in your Docs account, so you can move it to the desired folder later.
To Find your Email In Address :
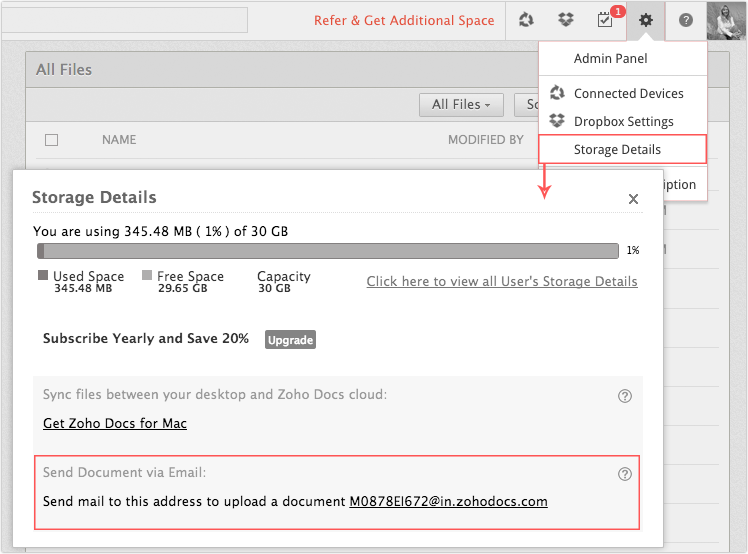
- Click on the Settings Icon at the top right
- Choose 'Storage Details' and your Email-in Address will be shown
To Email In the documents, simply forward the Email with the attachments to the Email -in address.
Related Articles
Online Collaboration
Tasks Docs lets you assign tasks to individuals and keep a track of what task has been assigned to whom and when it is due for completion. With the Docs Tasks feature you can send your documents across your colleagues for reviews and approvals. You ...Online Group Chat (Chat Rooms)
Team Collaborations provides real-time collaboration through built-in chat rooms which allows everyone to quickly come together to discuss important topics and make decision faster. You can create chat topics, invite participants, discuss and above ...Attach Files using Android
To attach files Go to the module (Leads, Accounts, Contacts, etc.). Tap a record and tap Attachments to upload files. Tap the Add icon. You will get the option to upload from various sources. You can also upload from third party apps like Dropbox, ...Attach Files using iPhone
To attach files Go to the Leads, Accounts, Contacts, Potentials or Cases module. Tap a record and tap Attachments to upload files. Tap the Add icon. You will get the option to upload from various sources. You can also upload from third party apps ...Attach Files in iPad
To attach files Go to a module and tap a record. Tap Attachments to upload files. Tap the Add icon. You will get the option to upload from various sources. You can also upload from third party apps like Dropbox, Google Drive, etc.